# ssh-keygen
Managing Geo-replication
This section introduces geo-replication, illustrates the various deployment scenarios, and explains how to configure geo-replication and mirroring.
About Geo-replication
Geo-replication provides a distributed, continuous, asynchronous, and incremental replication service from one site to another over Local Area Networks (LANs), Wide Area Networks (WANs), and the Internet.
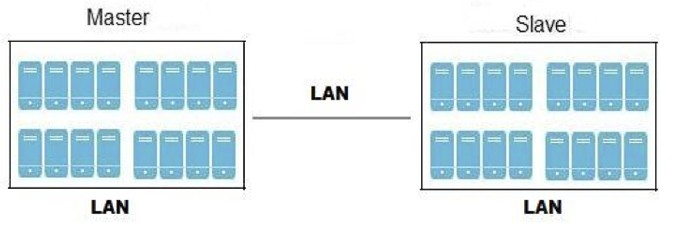
Geo-replication uses a master–slave model, where replication and mirroring occurs between the following partners:
-
Master – a GlusterFS volume.
-
Slave – a GlusterFS volume. A slave volume can be a volume on a remote host, such as
remote-host::volname.
Replicated Volumes vs Geo-replication
The following table lists the differences between replicated volumes and geo-replication:
| Replicated Volumes | Geo-replication |
|---|---|
Mirrors data across bricks within one trusted storage pool. |
Mirrors data across geographically distributed trusted storage pools. |
Provides high-availability. |
Provides back-ups of data for disaster recovery. |
Synchronous replication: each and every file operation is applied to all the bricks. |
Asynchronous replication: checks for changes in files periodically, and syncs them on detecting differences. |
Preparing to Deploy Geo-replication
This section provides an overview of geo-replication deployment scenarios, lists prerequisites, and describes how to setup the environment for geo-replication session.
Exploring Geo-replication Deployment Scenarios
Geo-replication provides an incremental replication service over Local Area Networks (LANs), Wide Area Network (WANs), and the Internet. This section illustrates the most common deployment scenarios for geo-replication, including the following:
-
Geo-replication over LAN
-
Geo-replication over WAN
-
Geo-replication over the Internet
-
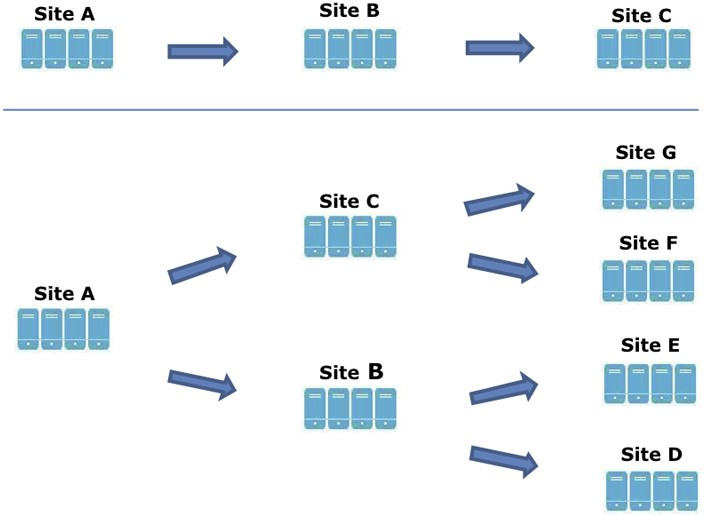
Multi-site cascading geo-replication
Geo-replication over LAN
Geo-replication over WAN

Geo-replication over Internet

Multi-site cascading Geo-replication
Geo-replication Deployment Overview
Deploying geo-replication involves the following steps:
-
Verify that your environment matches the minimum system requirements. See Prerequisites.
-
Determine the appropriate deployment scenario. See Exploring Geo-replication Deployment Scenarios.
-
Start geo-replication on the master and slave systems. See Starting Geo-replication.
Prerequisites
The following are prerequisites for deploying geo-replication:
-
The master and slave volumes must be of same version of GlusterFS instances.
-
Slave node must not be a peer of the any of the nodes of the Master trusted storage pool.
-
Passwordless SSH access is required between one node of the master volume (the node from which the
geo-replication createcommand will be executed), and one node of the slave volume (the node whose IP/hostname will be mentioned in the slave name when running thegeo-replication createcommand).Create the public and private keys using
ssh-keygen(without passphrase) on the master node:Copy the public key to the slave node using the following command:
# ssh-copy-id -i identity_file root@slave_node_IPaddress/Hostname
If you are setting up a non-root geo-replicaton session, then copy the public key to the respective
userlocation.Note
-
Passwordless SSH access is required from the master node to slave node, whereas passwordless SSH access is not required from the slave node to master node. - ssh-copy-id command does not work if ssh authorized_keys file is configured in the custom location. You must copy the contents of .ssh/id_rsa.pub file from the Master and paste it to authorized_keys file in the custom location on the Slave node.
A passwordless SSH connection is also required for
gsyncdbetween every node in the master to every node in the slave. Thegluster system:: execute gsec_createcommand createssecret-pemfiles on all the nodes in the master, and is used to implement the passwordless SSH connection. Thepush-pemoption in thegeo-replication createcommand pushes these keys to all the nodes in the slave.+ For more information on the
gluster system::execute gsec_createandpush-pemcommands, see Setting Up your Environment for Geo-replication Session. -
Setting Up your Environment
You can set up your environment for a geo-replication session in the following ways:
-
Setting Up your Environment for Geo-replication Session - In this method, the slave mount is owned by the root user.
-
Setting Up your Environment for a Secure Geo-replication Slave - This method is more secure as the slave mount is owned by a normal user.
Time Synchronization
Before configuring the geo-replication environment, ensure that the time on all the servers are synchronized.
-
All the servers' time must be uniform on bricks of a geo-replicated master volume. It is recommended to set up a NTP (Network Time Protocol) service to keep the bricks' time synchronized, and avoid out-of-time sync effects.
For example: In a replicated volume where brick1 of the master has the time 12:20, and brick2 of the master has the time 12:10 with a 10 minute time lag, all the changes on brick2 between in this period may go unnoticed during synchronization of files with a Slave.
For more information on configuring NTP, see https://access.redhat.com/documentation/en-US/Red_Hat_Enterprise_Linux/6/html/Deployment_Guide/ch-Configuring_NTP_Using_ntpd.html.
Setting Up your Environment for Geo-replication Session
-
To create a common
pem pubfile, run the following command on the master node where the passwordless SSH connection is configured:# gluster system:: execute gsec_create
-
Create the geo-replication session using the following command. The
push-pemoption is needed to perform the necessarypem-filesetup on the slave nodes.# gluster volume geo-replication MASTER_VOL SLAVE_HOST::SLAVE_VOL create push-pem [force]
For example:
# gluster volume geo-replication Volume1 example.com::slave-vol create push-pem
Note
There must be passwordless SSH access between the node from which this command is run, and the slave host specified in the above command. This command performs the slave verification, which includes checking for a valid slave URL, valid slave volume, and available space on the slave. If the verification fails, you can use the
forceoption which will ignore the failed verification and create a geo-replication session. -
Configure the meta-volume for geo-replication:
# gluster volume geo-replication MASTER_VOL SLAVE_HOST::SLAVE_VOL config use_meta_volume true
For example:
# gluster volume geo-replication Volume1 example.com::slave-vol config use_meta_volume true
For more information on configuring meta-volume, see Configuring a Meta-Volume.
-
Start the geo-replication by running the following command on the master node:
For example,
# gluster volume geo-replication MASTER_VOL SLAVE_HOST::SLAVE_VOL start [force]
-
Verify the status of the created session by running the following command:
# gluster volume geo-replication MASTER_VOL SLAVE_HOST::SLAVE_VOL status
Setting Up your Environment for a Secure Geo-replication Slave
Geo-replication supports access to GlusterFS slaves
through SSH using an unprivileged account (user account with non-zero
UID). This method is more secure and it reduces the master’s
capabilities over slave to the minimum. This feature relies on
mountbroker, an internal service of glusterd which manages the mounts
for unprivileged slave accounts. You must perform additional steps to
configure glusterd with the appropriate mountbroker’s access control
directives. The following example demonstrates this process:
Perform the following steps on all the Slave nodes to setup an auxiliary glusterFS mount for the unprivileged account:
-
Create a new group. For example,
geogroup.Note
You must not use multiple groups for the
mountbrokersetup. You can create multiple user accounts but the group should be same for all the non-root users. -
Create a unprivileged account. For example, ` geoaccount`. Add
geoaccountas a member of` geogroup` group. -
As a root, create a new directory with permissions 0711 and with correct SELinux context. Ensure that the location where this directory is created is writeable only by root but
geoaccountis able to access it.For example,
# mkdir /var/mountbroker-root
# chmod 0711 /var/mountbroker-root
# semanage fcontext -a -e /home /var/mountbroker-root
# restorecon -Rv /var/mountbroker-root
-
Non-root SSH login is used when the georeplication starts with non-root configuration. Gsyncd at slave side will be started by the non-root user. Hence, the read-write permissions must be enabled for glusterd working directory and the log directories. For example, to allow access for
geoaccountto access the working directory and log directories, run the following commands:# chgrp -R geogroup /var/log/glusterfs/geo-replication-slaves # chgrp -R geogroup /var/lib/glusterd/geo-replication # chmod -R 770 /var/lib/glusterd/geo-replication # chmod -R 770 /var/log/glusterfs/geo-replication-slaves
-
Run the following commands in any one of the Slave node:
# gluster system:: execute mountbroker opt mountbroker-root /var/mountbroker-root
# gluster system:: execute mountbroker user geoaccount slavevol
# gluster system:: execute mountbroker opt geo-replication-log-group geogroup
# gluster system:: execute mountbroker opt rpc-auth-allow-insecure on
See Storage Concepts for information on `glusterd.vol `volume file of a GlusterFS volume.
If the above commands fails, check if the
glusterd.volfile is available at/etc/glusterfs/ `directory. If not found, create a `glusterd.volfile containing the default configuration and save it at/etc/glusterfs/directory. Now re-run the above commands listed above to get all the required geo-replication options.The following is the sample
glusterd.volfile along with default options:volume management type mgmt/glusterd option working-directory /var/lib/glusterd option transport-type socket,rdma option transport.socket.keepalive-time 10 option transport.socket.keepalive-interval 2 option transport.socket.read-fail-log off option rpc-auth-allow-insecure on option mountbroker-root /var/mountbroker-root option mountbroker-geo-replication.geoaccount slavevol option geo-replication-log-group geogroup end-volume-
If you have multiple slave volumes on Slave, repeat Step 2 for each of them and run the following commands to update the vol file:
# gluster system:: execute mountbroker user geoaccount2 slavevol2
# gluster system:: execute mountbroker user geoaccount3 slavevol3
- You can use `gluster system
-
execute mountbroker info` command to view the configured mountbroker options.
-
You can add multiple slave volumes within the same account (geoaccount) by providing comma-separated list (without spaces) as the argument of
mountbroker-geo-replication.geogroup. You can also have multiple options of the formmountbroker-geo-replication.*. It is recommended to use one service account per Master machine. For example, if there are multiple slave volumes on Slave for the master machines Master1, Master2, and Master3, then create a dedicated service user on Slave for them by repeating Step 2. for each (like geogroup1, geogroup2, and geogroup3), and then run the following commands to add the corresponding options to the volfile:# gluster system:: execute mountbroker user geoaccount1 slavevol11,slavevol12,slavevol13 # gluster system:: execute mountbroker user geoaccount2 slavevol21,slavevol22 # gluster system:: execute mountbroker user geoaccount3 slavevol31
-
-
Restart
glusterdservice on all the Slave nodes.After you setup an auxiliary glusterFS mount for the unprivileged account on all the Slave nodes, perform the following steps to setup a non-root geo-replication session.:
-
Setup a passwordless SSH from one of the master node to the
useron one of the slave node.For example, to setup a passwordless SSH to the user geoaccount.
# ssh-keygen
# ssh-copy-id -i identity_file geoaccount@slave_node_IPaddress/Hostname
-
Create a common pem pub file by running the following command on the master node where the passwordless SSH connection is configured to the
useron the slave node:# gluster system:: execute gsec_create
-
Create a geo-replication relationship between master and slave to the
userby running the following command on the master node:For example,
# gluster volume geo-replication MASTERVOL geoaccount@SLAVENODE::slavevol create push-pem
If you have multiple slave volumes and/or multiple accounts, create a geo-replication session with that particular user and volume.
For example,
# gluster volume geo-replication MASTERVOL geoaccount2@SLAVENODE::slavevol2 create push-pem
-
In the slavenode, which is used to create relationship, run `/usr/libexec/glusterfs/set_geo_rep_pem_keys.sh `as a root with user name, master volume name, and slave volume names as the arguments.
For example,
# /usr/libexec/glusterfs/set_geo_rep_pem_keys.sh geoaccount MASTERVOL SLAVEVOL_NAME
-
Configure the meta-volume for geo-replication:
# gluster volume geo-replication MASTER_VOL SLAVE_HOST::SLAVE_VOL config use_meta_volume true
For example:
# gluster volume geo-replication Volume1 example.com::slave-vol config use_meta_volume true
For more information on configuring meta-volume, see Configuring a Meta-Volume.
-
Start the geo-replication with slave user by running the following command on the master node:
For example,
# gluster volume geo-replication MASTERVOL geoaccount@SLAVENODE::slavevol start
-
Verify the status of geo-replication session by running the following command on the master node:
# gluster volume geo-replication MASTERVOL geoaccount@SLAVENODE::slavevol status
Deleting a mountbroker geo-replication options after deleting session.
When mountbroker geo-replicaton session is deleted, use the following command to remove volumes per mountbroker user. If the volume to be removed is the last one for the mountbroker user, the user is also removed.
-
To delete a volumes per mountbroker user:
# gluster system:: execute mountbroker volumedel geoaccount2 slavevol2
You can delete multiple volumes per mountbroker user by providing comma-separated list (without spaces) as the argument of this command.
# gluster system:: execute mountbroker volumedel geoaccount2 slavevol2,slavevol3
Important
If you have a secured geo-replication setup, you must ensure to prefix the unprivileged user account to the slave volume in the command. For example, to execute a geo-replication status command, run the following:
# gluster volume geo-replication MASTERVOL geoaccount@SLAVENODE::slavevol statusIn this command,
geoaccountis the name of the unprivileged user account.
Configuring a Meta-Volume
For effective handling of node fail-overs in Master volume,
geo-replication requires a shared storage to be available across all
nodes of the cluster. Hence, you must ensure that a gluster volume named
gluster_shared_storage is created in the cluster, and is mounted at
/var/run/gluster/shared_storage on all the nodes in the cluster. For
more information on setting up shared storage volume, see
Managing Shared Volume.
-
Configure the meta-volume for geo-replication:
# gluster volume geo-replication MASTER_VOL SLAVE_HOST::SLAVE_VOL config use_meta_volume true
For example:
# gluster volume geo-replication Volume1 example.com::slave-vol config use_meta_volume true
Starting Geo-replication
This section describes how to and start geo-replication in your storage environment, and verify that it is functioning correctly.
Starting a Geo-replication Session
Important
You must create the geo-replication session before starting geo-replication. For more information, see Setting Up your Environment for Geo-replication Session.
To start geo-replication, use one of the following commands:
-
To start the geo-replication session between the hosts:
# gluster volume geo-replication MASTER_VOL SLAVE_HOST::SLAVE_VOL start
For example:
# gluster volume geo-replication Volume1 example.com::slave-vol start
Starting geo-replication session between Volume1 & example.com::slave-vol has been successful
This command will start distributed geo-replication on all the nodes that are part of the master volume. If a node that is part of the master volume is down, the command will still be successful. In a replica pair, the geo-replication session will be active on any of the replica nodes, but remain passive on the others.
After executing the command, it may take a few minutes for the session to initialize and become stable.
Note
If you attempt to create a geo-replication session and the slave already has data, the following error message will be displayed:
slave-node::slave is not empty. Please delete existing files in slave-node::slave and retry, or use force to continue without deleting the existing files. geo-replication command failed
-
To start the geo-replication session forcefully between the hosts:
# gluster volume geo-replication MASTER_VOL SLAVE_HOST::SLAVE_VOL start force
For example:
# gluster volume geo-replication Volume1 example.com::slave-vol start force
Starting geo-replication session between Volume1 & example.com::slave-vol has been successful
This command will force start geo-replication sessions on the nodes that are part of the master volume. If it is unable to successfully start the geo-replication session on any node which is online and part of the master volume, the command will still start the geo-replication sessions on as many nodes as it can. This command can also be used to re-start geo-replication sessions on the nodes where the session has died, or has not started.
Verifying a Successful Geo-replication Deployment
You can use the status command to verify the status of geo-replication
in your environment:
# gluster volume geo-replication MASTER_VOL SLAVE_HOST::SLAVE_VOL status
For example:
# gluster volume geo-replication Volume1 example.com::slave-vol status
Displaying Geo-replication Status Information
The status command can be used to display information about a specific
geo-replication master session, master-slave session, or all
geo-replication sessions. The status output provides both node and brick
level information.
-
To display information on all geo-replication sessions from a particular master volume, use the following command:
# gluster volume geo-replication MASTER_VOL status
-
To display information of a particular master-slave session, use the following command:
# gluster volume geo-replication MASTER_VOL SLAVE_HOST::SLAVE_VOL status
-
To display the details of a master-slave session, use the following command:
# gluster volume geo-replication MASTER_VOL SLAVE_HOST ::SLAVE_VOL status detail
Important
There will be a mismatch between the outputs of the
dfcommand (including-hand-k) and inode of the master and slave volumes when the data is in full sync. This is due to the extra inode and size consumption by thechangelogjournaling data, which keeps track of the changes done on the file system on themastervolume. Instead of running thedfcommand to verify the status of synchronization, use# gluster volume geo-replication MASTER_VOL SLAVE_HOST::SLAVE_VOL status detailinstead.The geo-replication status command output provides the following information: Master Node: Master node and Hostname as listed in the
gluster volume infocommand output Master Vol: Master volume name Master Brick: The path of the brick Status: The status of the geo-replication worker can be one of the following: * Initializing: This is the initial phase of the Geo-replication session; it remains in this state for a minute in order to make sure no abnormalities are present. * Created: The geo-replication session is created, but not started. * Active: Thegsyncdaemon in this node is active and syncing the data. * Passive: A replica pair of the active node. The data synchronization is handled by the active node. Hence, this node does not sync any data. * Faulty: The geo-replication session has experienced a problem, and the issue needs to be investigated further. For more information, see Troubleshooting Geo-replication section. * Stopped: The geo-replication session has stopped, but has not been deleted. Crawl Status : Crawl status can be on of the following: * Changelog Crawl: Thechangelogtranslator has produced the changelog and that is being consumed bygsyncddaemon to sync data. * Hybrid Crawl: The ` gsyncd` daemon is crawling the glusterFS file system and generating pseudo changelog to sync data. * History Crawl: Thegsyncddaemon consumes the history changelogs produced by the changelog translator to sync data. Last Synced: The last synced time. Entry: The number of pending entry (CREATE, MKDIR, RENAME, UNLINK etc) operations per session. Data: The number ofDataoperations pending per session. Meta: The number ofMetaoperations pending per session. Failures: The number of failures. If the failure count is more than zero, view the log files for errors in the Master bricks. Checkpoint Time: Displays the date and time of the checkpoint, if set. Otherwise, it displays as N/A. Checkpoint Completed: Displays the status of the checkpoint. Checkpoint Completion Time: Displays the cCompletion time if Checkpoint is completed. Otherwise, it displays as N/A.
Configuring a Geo-replication Session
To configure a geo-replication session, use the following command:
# gluster volume geo-replication MASTER_VOL SLAVE_HOST::SLAVE_VOL config [Name] [Value]
For example:
# gluster volume geo-replication Volume1 example.com::slave-vol config use_tarssh true
For example, to view the list of all option/value pairs:
# gluster volume geo-replication Volume1 example.com::slave-vol config
To delete a setting for a geo-replication config option, prefix the
option with ! (exclamation mark). For example, to reset log-level to
the default value:
# gluster volume geo-replication Volume1 example.com::slave-vol config '!log-level'
Warning
You must ensure to perform these configuration changes when all the peers in cluster are in
Connected(online) state. If you change the configuration when any of the peer is down, the geo-replication cluster would be in inconsistent state when the node comes back online.
Configurable Options.
The following table provides an overview of the configurable options for a geo-replication setting:
| Option | Description |
|---|---|
gluster-log-file LOGFILE |
The path to the geo-replication glusterfs log file. |
gluster-log-level LOGFILELEVEL |
The log level for glusterfs processes. |
log-file LOGFILE |
The path to the geo-replication log file. |
log-level LOGFILELEVEL |
The log level for geo-replication. |
ssh-command COMMAND |
The SSH command to connect to the remote machine
(the default is |
rsync-command COMMAND |
The rsync command to use for synchronizing the
files (the default is |
use-tarssh [true |
false] |
The use-tarssh command allows tar over Secure Shell protocol. Use this option to handle workloads of files that have not undergone edits. |
volume_id=UID |
The command to delete the existing master UID for the intermediate/slave node. |
timeout SECONDS |
The timeout period in seconds. |
sync-jobs N |
The number of simultaneous files/directories that can be synchronized. |
ignore-deletes |
If this option is set to |
checkpoint [LABEL |
now] |
Sets a checkpoint with the given option LABEL.
If the option is set as |
sync-acls [true |
false] |
Syncs acls to the Slave cluster. By default, this option is enabled.
|
sync-xattrs [true |
false] |
Syncs extended attributes to the Slave cluster. By default, this option is enabled.
|
log-rsync-performance [true |
false] |
If this option is set to
|
rsync-options |
Additional options to rsync. For example, you can limit the rsync bandwidth usage "--bwlimit=<value>". |
use-meta-volume [true |
false] |
Set this option to
|
meta-volume-mnt PATH |
The path of the meta volume mount point. |
Geo-replication Checkpoints
About Geo-replication Checkpoints
Geo-replication data synchronization is an asynchronous process, so changes made on the master may take time to be replicated to the slaves. Data replication to a slave may also be interrupted by various issues, such network outages.
GlusterFS provides the ability to set geo-replication checkpoints. By setting a checkpoint, synchronization information is available on whether the data that was on the master at that point in time has been replicated to the slaves.
Configuring and Viewing Geo-replication Checkpoint Information
-
To set a checkpoint on a geo-replication session, use the following command:
# gluster volume geo-replication MASTER_VOL SLAVE_HOST::SLAVE_VOL config checkpoint [now|LABEL]
For example, to set checkpoint between
Volume1andexample.com:/data/remote_dir:# gluster volume geo-replication Volume1 example.com::slave-vol config checkpoint now geo-replication config updated successfully
The label for a checkpoint can be set as the current time using
now, or a particular label can be specified, as shown below:# gluster volume geo-replication Volume1 example.com::slave-vol config checkpoint NEW_ACCOUNTS_CREATED geo-replication config updated successfully.
-
To display the status of a checkpoint for a geo-replication session, use the following command:
# gluster volume geo-replication MASTER_VOL SLAVE_HOST::SLAVE_VOL status detail
-
To delete checkpoints for a geo-replication session, use the following command:
# gluster volume geo-replication MASTER_VOL SLAVE_HOST::SLAVE_VOL config '!checkpoint'
For example, to delete the checkpoint set between
Volume1andexample.com::slave-vol:# gluster volume geo-replication Volume1 example.com::slave-vol config '!checkpoint' geo-replication config updated successfully
Stopping a Geo-replication Session
To stop a geo-replication session, use one of the following commands:
-
To stop a geo-replication session between the hosts:
# gluster volume geo-replication MASTER_VOL SLAVE_HOST::SLAVE_VOL stop
For example:
# gluster volume geo-replication Volume1 example.com::slave-vol stop
Stopping geo-replication session between Volume1 & example.com::slave-vol has been successful
Note
The
stopcommand will fail if:-
any node that is a part of the volume is offline.
-
if it is unable to stop the geo-replication session on any particular node.
-
if the geo-replication session between the master and slave is not active.
-
-
To stop a geo-replication session forcefully between the hosts:
# gluster volume geo-replication MASTER_VOL SLAVE_HOST::SLAVE_VOL stop force
For example:
# gluster volume geo-replication Volume1 example.com::slave-vol stop force
Stopping geo-replication session between Volume1 & example.com::slave-vol has been successful
Using
forcewill stop the geo-replication session between the master and slave even if any node that is a part of the volume is offline. If it is unable to stop the geo-replication session on any particular node, the command will still stop the geo-replication sessions on as many nodes as it can. Usingforcewill also stop inactive geo-replication sessions.
Deleting a Geo-replication Session
Important
You must first stop a geo-replication session before it can be deleted. For more information, see Stopping a Geo-replication Session.
To delete a geo-replication session, use the following command:
# gluster volume geo-replication MASTER_VOL SLAVE_HOST::SLAVE_VOL delete
For example:
# gluster volume geo-replication Volume1 example.com::slave-vol delete
geo-replication command executed successfully
Note
The
deletecommand will fail if:
any node that is a part of the volume is offline.
if it is unable to delete the geo-replication session on any particular node.
if the geo-replication session between the master and slave is still active.
Important
The SSH keys will not removed from the master and slave nodes when the geo-replication session is deleted. You can manually remove the
pemfiles which contain the SSH keys from the/var/lib/glusterd/geo-replication/directory.
Starting Geo-replication on a Newly Added Brick or Node
Starting Geo-replication for a New Brick or New Node
If a geo-replication session is running, and a new node is added to the trusted storage pool or a brick is added to the volume from a newly added node in the trusted storage pool, then you must perform the following steps to start the geo-replication daemon on the new node:
-
Run the following command on the master node where passwordless SSH connection is configured, in order to create a common
pem pubfile.# gluster system:: execute gsec_create
-
Create the geo-replication session using the following command. The
push-pemandforceoptions are required to perform the necessarypem-filesetup on the slave nodes.# gluster volume geo-replication MASTER_VOL SLAVE_HOST::SLAVE_VOL create push-pem force
For example:
# gluster volume geo-replication Volume1 example.com::slave-vol create push-pem force
Note
There must be passwordless SSH access between the node from which this command is run, and the slave host specified in the above command. This command performs the slave verification, which includes checking for a valid slave URL, valid slave volume, and available space on the slave.
-
After successfully setting up the shared storage volume, when a new node is added to the cluster, the shared storage is not mounted automatically on this node. Neither is the
/etc/fstabentry added for the shared storage on this node. To make use of shared storage on this node, execute the following commands:# mount -t glusterfs <local node's ip>:gluster_shared_storage /var/run/gluster/shared_storage # cp /etc/fstab /var/run/gluster/fstab.tmp # echo "<local node's ip>:/gluster_shared_storage /var/run/gluster/shared_storage/ glusterfs defaults 0 0" >> /etc/fstab
For more information on setting up shared storage volume, see Managing Shared Volume.
-
Configure the meta-volume for geo-replication:
# gluster volume geo-replication MASTER_VOL SLAVE_HOST::SLAVE_VOL config use_meta_volume true
For example:
# gluster volume geo-replication Volume1 example.com::slave-vol config use_meta_volume true
For more information on configuring meta-volume, see Configuring a Meta-Volume.
-
If a node is added at slave, stop the geo-replication session using the following command:
# gluster volume geo-replication MASTER_VOL SLAVE_HOST::SLAVE_VOL stop
-
Start the geo-replication session between the slave and master forcefully, using the following command:
# gluster volume geo-replication MASTER_VOL SLAVE_HOST::SLAVE_VOL start force
-
Verify the status of the created session, using the following command:
# gluster volume geo-replication MASTER_VOL SLAVE_HOST::SLAVE_VOL status
Starting Geo-replication for a New Brick on an Existing Node
When adding a brick to the volume on an existing node in the trusted storage pool with a geo-replication session running, the geo-replication daemon on that particular node will automatically be restarted. The new brick will then be recognized by the geo-replication daemon. This is an automated process and no configuration changes are required.
Scheduling Geo-replication as a Cron Job
Cron is a daemon that can be used to schedule the execution of recurring tasks according to a combination of the time, day of the month, month, day of the week, and week. Cron assumes that the system is ON continuously. If the system is not ON when a task is scheduled, it is not executed. A script is provided to run geo-replication only when required or to schedule geo-replication to run during low I/O.
For more information on installing Cron and configuring Cron jobs, see https://access.redhat.com/documentation/en-US/Red_Hat_Enterprise_Linux/7/html-single/System_Administrators_Guide/index.html#ch-Automating_System_Tasks
The script provided to schedule the geo-replication session, performs the following:
-
Stops the geo-replication session, if started
-
Starts the geo-replication session
-
Sets the Checkpoint
-
Checks the status of checkpoint until it is complete
-
After the checkpoint is complete, stops the geo-replication session
Run geo-replication Session.
To run a geo-reolication session only when required, run the following script:
# python /usr/share/glusterfs/scripts/schedule_georep.py MASTERVOL SLAVEHOST SLAVEVOL
For example,
# python /usr/share/glusterfs/scripts/schedule_georep.py Volume1 example.com slave-vol
Run the following command to view the help:
# python /usr/share/glusterfs/scripts/schedule_georep.py --help
Schedule a Cron Job.
To schedule geo-replication to run automatically using Cron:
minute hour day month day-of-week directory_and_script-to-execute MASTERVOL SLAVEHOST SLAVEVOL >> log_file_for_script_output
For example, to run geo-replication daily at 20:30 hours, run the following:
30 20 * * * root python /usr/share/glusterfs/scripts/schedule_georep.py --no-color Volume1 example.com slave-vol >> /var/log/glusterfs/schedule_georep.log 2>&1
Disaster Recovery
GlusterFS provides geo-replication failover and failback
capabilities for disaster recovery. If the master goes offline, you can
perform a failover procedure so that a slave can replace the master.
When this happens, all the I/O operations, including reads and writes,
are done on the slave which is now acting as the master. When the
original master is back online, you can perform a failback procedure
on the original slave so that it synchronizes the differences back to
the original master.
Failover: Promoting a Slave to Master
If the master volume goes offline, you can promote a slave volume to be the master, and start using that volume for data access.
Run the following commands on the slave machine to promote it to be the master:
# gluster volume set VOLNAME geo-replication.indexing on
# gluster volume set VOLNAME changelog on
For example
# gluster volume set slave-vol geo-replication.indexing on
volume set: success
# gluster volume set slave-vol changelog on
volume set: success
You can now configure applications to use the slave volume for I/O operations.
Failback: Resuming Master and Slave back to their Original State
When the original master is back online, you can perform the following procedure on the original slave so that it synchronizes the differences back to the original master:
-
Stop the existing geo-rep session from original master to orginal slave using the following command:
# gluster volume geo-replication ORIGINAL_MASTER_VOL ORIGINAL_SLAVE_HOST::ORIGINAL_SLAVE_VOL stop force
For example,
# gluster volume geo-replication  Volume1 example.com::slave-vol stop force
Stopping geo-replication session between Volume1 and example.com::slave-vol has been successful
-
Create a new geo-replication session with the original slave as the new master, and the original master as the new slave with
forceoption. Detailed information on creating geo-replication session is available at: . -
Start the special synchronization mode to speed up the recovery of data from slave. This option adds capability to geo-replication to ignore the files created before enabling
indexingoption. With this option, geo-replication will synchronize only those files which are created after making Slave volume as Master volume.# gluster volume geo-replication ORIGINAL_SLAVE_VOL ORIGINAL_MASTER_HOST::ORIGINAL_MASTER_VOL config special-sync-mode recover
For example,
# gluster volume geo-replication  slave-vol master.com::Volume1 config special-sync-mode recover
geo-replication config updated successfully
-
Start the new geo-replication session using the following command:
# gluster volume geo-replication ORIGINAL_SLAVE_VOL ORIGINAL_MASTER_HOST::ORIGINAL_MASTER_VOL start
For example,
# gluster volume geo-replication slave-vol master.com::Volume1 start
Starting geo-replication session between slave-vol and master.com::Volume1 has been successful
-
Stop the I/O operations on the original slave and set the checkpoint. By setting a checkpoint, synchronization information is available on whether the data that was on the master at that point in time has been replicated to the slaves.
# gluster volume geo-replication ORIGINAL_SLAVE_VOL ORIGINAL_MASTER_HOST::ORIGINAL_MASTER_VOL config checkpoint now
For example,
# gluster volume geo-replication slave-vol master.com::Volume1 config checkpoint now
geo-replication config updated successfully
-
Checkpoint completion ensures that the data from the original slave is restored back to the original master. But since the IOs were stopped at slave before checkpoint was set, we need to touch the slave mount for checkpoint to be completed
# touch orginial_slave_mount
# gluster volume geo-replication ORIGINAL_SLAVE_VOL ORIGINAL_MASTER_HOST::ORIGINAL_MASTER_VOL status detail
For example,
# touch /mnt/gluster/slavevol
# gluster volume geo-replication slave-vol master.com::Volume1 status detail
-
After the checkpoint is complete, stop and delete the current geo-replication session between the original slave and original master
# gluster volume geo-replication ORIGINAL_SLAVE_VOL ORIGINAL_MASTER_HOST::ORIGINAL_MASTER_VOL stop
# gluster volume geo-replication ORIGINAL_SLAVE_VOL ORIGINAL_MASTER_HOST::ORIGINAL_MASTER_VOL delete
For example,
# gluster volume geo-replication slave-vol master.com::Volume1 stop
Stopping geo-replication session between slave-vol and master.com::Volume1 has been successful

# gluster volume geo-replication slave-vol master.com::Volume1 delete
geo-replication command executed successfully
-
Reset the options that were set for promoting the slave volume as the master volume by running the following commands:
# gluster volume reset ORIGINAL_SLAVE_VOL geo-replication.indexing force
# gluster volume reset ORIGINAL_SLAVE_VOL changelog
For example,
# gluster volume reset slave-vol geo-replication.indexing force
volume set: success

# gluster volume reset slave-vol changelog
volume set: success
-
Resume the original roles by starting the geo-rep session from the original master using the following command:
# gluster volume geo-replication ORIGINAL_MASTER_VOL ORIGINAL_SLAVE_HOST::ORIGINAL_SLAVE_VOL start
# gluster volume geo-replication Volume1 example.com::slave-vol start
Starting geo-replication session between slave-vol  and master.com::Volume1 been successful
Creating a Snapshot of Geo-replicated Volume
The GlusterFS Snapshot feature enables you to create point-in-time copies of GlusterFS volumes, which you can use to protect data. You can create snapshots of Geo-replicated volumes.
For information on prerequisites, creating, and restoring snapshots of geo-replicated volume, see Managing Snapshots. Creation of a snapshot when geo-replication session is live is not supported and creation of snapshot in this scenario will display the following error:
# gluster snapshot create snap1 master
snapshot create: failed: geo-replication session is running for the volume master. Session needs to be stopped before taking a snapshot.
Snapshot command failed
.
You must ensure to pause the geo-replication session before creating snapshot and resume geo-replication session after creating the snapshot. Information on restoring geo-replicated volume is also available in the Managing Snapshotschapter.
Example - Setting up Cascading Geo-replication
This section provides step by step instructions to set up a cascading geo-replication session. The configuration of this example has three volumes and the volume names are master-vol, interimmaster-vol, and slave-vol.
-
Verify that your environment matches the minimum system requirements listed in Prerequisites.
-
Determine the appropriate deployment scenario. For more information on deployment scenarios, see Exploring Geo-replication Deployment Scenarios.
-
Configure the environment and create a geo-replication session between master-vol and interimmaster-vol.
-
Create a common pem pub file, run the following command on the master node where the passwordless SSH connection is configured:
# gluster system:: execute gsec_create
-
Create the geo-replication session using the following command. The push-pem option is needed to perform the necessary pem-file setup on the interimmaster nodes.
# gluster volume geo-replication master-vol interimhost.com::interimmaster-vol create
push-pem
-
Verify the status of the created session by running the following command:
# gluster volume geo-replication master-vol interimhost::interimmaster-vol status
-
Configure the meta-volume for geo-replication:
# gluster volume geo-replication master-vol interimhost.com::interimmaster-vol config use_meta_volume true
For more information on configuring meta-volume, see Configuring a Meta-Volume.
-
Start a Geo-replication session between the hosts:
# gluster volume geo-replication master-vol interimhost.com::interimmaster-vol start
This command will start distributed geo-replication on all the nodes that are part of the master volume. If a node that is part of the master volume is down, the command will still be successful. In a replica pair, the geo-replication session will be active on any of the replica nodes, but remain passive on the others. After executing the command, it may take a few minutes for the session to initialize and become stable.
-
Verifying the status of geo-replication session by running the following command:
# gluster volume geo-replication master-vol interimhost.com::interimmaster-vol status
-
Create a geo-replication session between interimmaster-vol and slave-vol.
-
Create a common pem pub file by running the following command on the interimmaster master node where the passwordless SSH connection is configured:
# gluster system:: execute gsec_create
-
On interimmaster node, create the geo-replication session using the following command. The push-pem option is needed to perform the necessary pem-file setup on the slave nodes.
# gluster volume geo-replication interimmaster-vol slave_host.com::slave-vol create push-pem
-
Verify the status of the created session by running the following command:
# gluster volume geo-replication interrimmaster-vol slave_host::slave-vol status
-
Configure the meta-volume for geo-replication:
# gluster volume geo-replication interrimmaster-vol slave_host::slave-vol config use_meta_volume true
For more information on configuring meta-volume, see Configuring a Meta-Volume.
-
Start a geo-replication session between interrimaster-vol and slave-vol by running the following command:
# gluster volume geo-replication interrimmaster-vol slave_host.com::slave-vol start
-
Verify the status of geo-replication session by running the following:
# gluster volume geo-replication interrimmaster-vol slave_host.com::slave-vol status
Recommended Practices
Manually Setting the Time.
If you have to change the time on the bricks manually, then the geo-replication session and indexing must be disabled when setting the time on all the bricks. All bricks in a geo-replication environment must be set to the same time, as this avoids the out-of-time sync issue described in Setting Up your Environment for Geo-replication Session. Bricks not operating on the same time setting, or changing the time while the geo-replication is running, will corrupt the geo-replication index. The recommended way to set the time manually is using the following procedure.
-
Stop geo-replication between the master and slave, using the following command:
# gluster volume geo-replication MASTER_VOL SLAVE_HOST::SLAVE_VOL stop
-
Stop geo-replication indexing, using the following command:
# gluster volume set MASTER_VOL geo-replication.indexing off
-
Set a uniform time on all the bricks.
-
Restart the geo-replication sessions, using the following command:
# gluster volume geo-replication MASTER_VOL SLAVE_HOST::SLAVE_VOL start
Performance Tuning.
When the following option is set, it has been observed that there is an increase in geo-replication performance. On the slave volume, run the following command:
# gluster volume set SLAVE_VOL batch-fsync-delay-usec 0
Initially Replicating Large Volumes to a Remote Slave Locally using a LAN.
For replicating large volumes to a slave in a remote location, it may be useful to do the initial replication to disks locally on a local area network (LAN), and then physically transport the disks to the remote location. This eliminates the need of doing the initial replication of the whole volume over a slower and more expensive wide area network (WAN) connection. The following procedure provides instructions for setting up a local geo-replication session, physically transporting the disks to the remote location, and then setting up geo-replication over a WAN.
-
Create a geo-replication session locally within the LAN. For information on creating a geo-replication session, see Setting Up your Environment for Geo-replication Session.
Important
You must remember the order in which the bricks/disks are specified when creating the slave volume. This information is required later for configuring the remote geo-replication session over the WAN.
-
Ensure that the initial data on the master is synced to the slave volume. You can verify the status of the synchronization by using the
statuscommand, as shown in Displaying Geo-replication Status Information. -
Stop and delete the geo-replication session.
For information on stopping and deleting the the geo-replication session, see Stopping a Geo-replication Session and Deleting a Geo-replication Session.
Important
You must ensure that there are no stale files in
/var/lib/glusterd/geo-replication/. -
Stop and delete the slave volume.
For information on stopping and deleting the volume, see Stopping Volumes and Deleting Volumes.
-
Remove the disks from the slave nodes, and physically transport them to the remote location. Make sure to remember the order in which the disks were specified in the volume.
-
At the remote location, attach the disks and mount them on the slave nodes. Make sure that the file system or logical volume manager is recognized, and that the data is accessible after mounting it.
-
Configure a trusted storage pool for the slave using the
peer probecommand.For information on configuring a trusted storage pool, see Trusted Storage Pools.
-
Delete the glusterFS-related attributes on the bricks. This should be done before creating the volume. You can remove the glusterFS-related attributes by running the following command:
# for i in `getfattr -d -m . ABSOLUTE_PATH_TO_BRICK 2>/dev/null | grep trusted | awk -F = '{print $1}'`; do setfattr -x $i ABSOLUTE_PATH_TO_BRICK; doneRun the following command to ensure that there are no
xattrsstill set on the brick:# getfattr -d -m . ABSOLUTE_PATH_TO_BRICK
-
After creating the trusted storage pool, create the GlusterFS volume with the same configuration that it had when it was on the LAN. For information on creating volumes, see Gluster Volumes
Important
Make sure to specify the bricks in same order as they were previously when on the LAN. A mismatch in the specification of the brick order may lead to data loss or corruption.
-
Start and mount the volume, and check if the data is intact and accessible.
For information on starting and mounting volumes, see [Starting_Volumes1] and Setting up clients
-
Configure the environment and create a geo-replication session from the master to this remote slave.
For information on configuring the environment and creating a geo-replication session, see Setting Up your Environment for Geo-replication Session.
-
Start the geo-replication session between the master and the remote slave.
For information on starting the geo-replication session, see Starting Geo-replication.
-
Use the
statuscommand to verify the status of the session, and check if all the nodes in the session are stable.For information on the
status, see Displaying Geo-replication Status Information.
Troubleshooting Geo-replication
This section describes the most common troubleshooting scenarios related to geo-replication.
Tuning Geo-replication performance with Change Log
There are options for the change log that can be configured to give better performance in a geo-replication environment.
The rollover-time option sets the rate at which the change log is
consumed. The default rollover time is 60 seconds, but it can be
configured to a faster rate. A recommended rollover-time for
geo-replication is 10-15 seconds. To change the rollover-time option,
use following the command:
# gluster volume set VOLNAME rollover-time 15
The fsync-interval option determines the frequency that updates to the
change log are written to disk. The default interval is 0, which means
that updates to the change log are written synchronously as they occur,
and this may negatively impact performance in a geo-replication
environment. Configuring fsync-interval to a non-zero value will write
updates to disk asynchronously at the specified interval. To change the
fsync-interval option, use following the command:
# gluster volume set VOLNAME fsync-interval 3
Triggering Explicit Sync on Entries
Geo-replication provides an option to explicitly trigger the sync
operation of files and directories. A virtual extended attribute
glusterfs.geo-rep.trigger-sync is provided to accomplish the same.
# setfattr -n glusterfs.geo-rep.trigger-sync -v "1" <file-path>
The support of explicit trigger of sync is supported only for directories and regular files.
Synchronization Is Not Complete
Situation.
The geo-replication status is displayed as Stable, but the data has
not been completely synchronized.
Solution.
A full synchronization of the data can be performed by erasing the index and restarting geo-replication. After restarting geo-replication, it will begin a synchronization of the data using checksums. This may be a long and resource intensive process on large data sets.
For more information about erasing the index, see Configuring Volume Options.
Issues with File Synchronization
Situation.
The geo-replication status is displayed as Stable, but only
directories and symlinks are synchronized. Error messages similar to the
following are in the logs:
[2011-05-02 13:42:13.467644] E [master:288:regjob] GMaster: failed to sync ./some_file`
Solution.
Geo-replication requires rsync v3.0.0 or higher on the host and the
remote machines. Verify if you have installed the required version of
rsync.
Geo-replication Status is Often Faulty
Situation.
The geo-replication status is often displayed as Faulty, with a
backtrace similar to the following:
012-09-28 14:06:18.378859] E [syncdutils:131:log_raise_exception] <top>: FAIL: Traceback (most recent call last): File "/usr/local/libexec/glusterfs/python/syncdaemon/syncdutils.py", line 152, in twraptf(*aa) File "/usr/local/libexec/glusterfs/python/syncdaemon/repce.py", line 118, in listen rid, exc, res = recv(self.inf) File "/usr/local/libexec/glusterfs/python/syncdaemon/repce.py", line 42, in recv return pickle.load(inf) EOFError
Solution.
This usually indicates that RPC communication between the master gsyncd module and slave gsyncd module is broken. Make sure that the following pre-requisites are met:
-
Passwordless SSH is set up properly between the host and remote machines.
-
FUSE is installed on the machines. The geo-replication module mounts GlusterFS volumes using FUSE to sync data.
Intermediate Master is in a Faulty State
Situation.
In a cascading environment, the intermediate master is in a faulty state, and messages similar to the following are in the log:
raise RuntimeError ("aborting on uuid change from %s to %s" % \ RuntimeError: aborting on uuid change from af07e07c-427f-4586-ab9f- 4bf7d299be81 to de6b5040-8f4e-4575-8831-c4f55bd41154
Solution.
In a cascading configuration, an intermediate master is loyal to its
original primary master. The above log message indicates that the
geo-replication module has detected that the primary master has changed.
If this change was deliberate, delete the volume-id configuration
option in the session that was initiated from the intermediate master.
Remote gsyncd Not Found
Situation.
The master is in a faulty state, and messages similar to the following are in the log:
[2012-04-04 03:41:40.324496] E [resource:169:errfail] Popen: ssh> bash: /usr/local/libexec/glusterfs/gsyncd: No such file or directory
Solution.
The steps to configure a SSH connection for geo-replication have been updated. Use the steps as described in Setting Up your Environment for Geo-replication Session.