# ssh-keygen -f id_rsa -t rsa -N ''
GlusterFS Volumes
A GlusterFS volume is a logical collection of bricks, where each brick is an export directory on a server in the trusted storage pool. Most of the GlusterFS Server management operations are performed on the volume. For a detailed information about configuring GlusterFS for enhancing performance see, Configuring GlusterFS for Enhancing Performance.
Warning
Red Hat does not support writing data directly into the bricks. Read and write data only through the Native Client, or through NFS or SMB mounts.
Note
GlusterFS supports IP over Infiniband (IPoIB). Install Infiniband packages on all GlusterFS servers and clients to support this feature. Run the
yum groupinstall "Infiniband Support"to install Infiniband packages.
- Distributed
-
Distributes files across bricks in the volume. + Use this volume type where scaling and redundancy requirements are not important, or provided by other hardware or software layers. + See Creating Distributed Volumes for additional information about this volume type.
- Replicated
-
Replicates files across bricks in the volume. + Use this volume type in environments where high-availability and high-reliability are critical. + See Creating Replicated Volumes for additional information about this volume type.
- Distributed Replicated
-
Distributes files across replicated bricks in the volume. + Use this volume type in environments where high-reliability and scalability are critical. This volume type offers improved read performance in most environments. + See Creating Distributed Replicated Volumes for additional information about this volume type.
- Dispersed
-
Disperses the file’s data across the bricks in the volume. + Use this volume type where you need a configurable level of reliability with a minimum space waste. + See Creating Dispersed Volumes for additional information about this volume type.
- Distributed Dispersed
-
Distributes file’s data across the dispersed subvolume. + Use this volume type where you need a configurable level of reliability with a minimum space waste. + See Creating Distributed Dispersed Volumes for additional information about this volume type.
Setting up GlusterFS Volumes using gdeploy
The gdeploy tool automates the process of creating, formatting, and mounting bricks. With gdeploy, the manual steps listed between Section 6.3 Formatting and Mounting Bricks and Section 6.8 Creating Distributed Dispersed Volumes are automated.
When setting-up a new trusted storage pool, gdeploy could be the preferred choice of trusted storage pool set up, as manually executing numerous commands can be error prone.
The advantages of using gdeploy to automate brick creation are as follows:
-
Setting-up the backend on several machines can be done from one’s laptop/desktop. This saves time and scales up well when the number of nodes in the trusted storage pool increase.
-
Flexibility in choosing the drives to configure. (sd, vd, …).
-
Flexibility in naming the logical volumes (LV) and volume groups (VG).
Getting Started
Prerequisites.
-
Generate the passphrase-less SSH keys for the nodes which are going to be part of the trusted storage pool by running the following command:
-
Set up password-less SSH access between the gdeploy controller and servers by running the following command:
# ssh-copy-id -i root@server
Note
If you are using a GlusterFS node as the deployment node and not an external node, then the password-less SSH must be set up for the GlusterFS node from where the installation is performed using the following command:
# ssh-copy-id -i root@localhost
-
Install
ansibleby executing the following command:-
For GlusterFS 3.1.3 on Red Hat Enterprise Linux 7.2, execute the following command:
# yum install ansible
-
For GlusterFS 3.1.3 on Red Hat Enterprise Linux 6.8, execute the following command:
# yum install ansible1.9
-
-
You must also ensure the following:
-
Devices should be raw and unused
-
For multiple devices, use multiple volume groups, thinpool and thinvol in the
gdeployconfiguration file- gdeploy can be used to deploy GlusterFS in two ways
-
Using a node in a trusted storage pool
-
Using a machine outside the trusted storage pool
-
Using a node in a cluster.
The gdeploy package is bundled as part of the initial installation of
GlusterFS.
Using a machine outside the trusted storage pool.
Execute the following command to install gdeploy:
# yum install gdeploy
Setting up a Trusted Storage Pool
Creating a trusted storage pool is a tedious task and becomes more tedious as the nodes in the trusted storage pool grow. With gdeploy, just a configuration file can be used to set up a trusted storage pool. When gdeploy is installed, a sample configuration file will be created at:
/usr/share/doc/ansible/gdeploy/examples/gluster.conf.sample
Note
The trusted storage pool can be created either by performing each tasks, such as, setting up a backend, creating a volume, and mounting volumes independently or summed up as a single configuration.
For example, for a basic trusted storage pool of a 2 x 2 replicated volume the configuration details in the configuration file will be as follows:
2x2-volume-create.conf:
#
# Usage:
#       gdeploy -c 2x2-volume-create.conf
#
# This does backend setup first and then create the volume using the
# setup bricks.
#
#

[hosts]
10.70.46.13
10.70.46.17


# Common backend setup for 2 of the hosts.
[backend-setup]
devices=sdb,sdc
vgs=vg1,vg2
pools=pool1,pool2
lvs=lv1,lv2
mountpoints=/mnt/data1,/mnt/data2
brick_dirs=/mnt/data1/1,/mnt/data2/2

# If backend-setup is different for each host
# [backend-setup:10.70.46.13]
# devices=sdb
# brick_dirs=/rhgs/brick1
#
# [backend-setup:10.70.46.17]
# devices=sda,sdb,sdc
# brick_dirs=/gluster/brick/brick{1,2,3}
#

[volume]
action=create
volname=sample_volname
replica=yes
replica_count=2
force=yes


[clients]
action=mount
volname=sample_volname
hosts=10.70.46.15
fstype=glusterfs
client_mount_points=/mnt/gluster
With this configuration a 2 x 2 replica trusted storage pool with the given IP addresses and backend device as /dev/sdb,/dev/sdc with the volume name as sample_volname will be created.
For more information on possible values, see Configuration File
After modifying the configuration file, invoke the configuration using the command:
# gdeploy -c conf.txt
Note
You can create a new configuration file by referencing the template file available at
/usr/share/doc/ansible/gdeploy/examples/gluster.conf.sample. To invoke the new configuration file, rungdeploy -c /path_to_file/config.txtcommand.
To only setup the backend see, Setting up the Backend
To only create a volume see, Creating Volumes
To only mount clients see, Mounting Clients
Setting up the Backend
In order to setup a GlusterFS volume, the LVM thin-p must be set up on the storage disks. If the number of machines in the trusted storage pool is huge, these tasks takes a long time, as the number of commands involved are huge and error prone if not cautious. With gdeploy, just a configuration file can be used to set up a backend. The backend is setup at the time of setting up a fresh trusted storage pool, which requires bricks to be setup before creating a volume. When gdeploy is installed, a sample configuration file will be created at:
/usr/share/doc/ansible/gdeploy/examples/gluster.conf.sample
A backend can be setup in two ways:
-
Using the [backend-setup] module
-
Creating Physical Volume (PV), Volume Group (VG), and Logical Volume (LV) individually
Using the [backend-setup] Module
Backend setup can be done on specific machines or on all the machines. The backend-setup module internally creates PV, VG, and LV and mounts the device. Thin-p logical volumes are created as per the performance recommendations by Red Hat.
The backend can be setup based on the requirement, such as:
-
Generic
-
Specific
Generic.
If the disk names are uniform across the machines then backend setup can be written as below. The backend is setup for all the hosts in the `hosts’ section.
For more information on possible values, see Configuration File
Example configuration file: Backend-setup-generic.conf
#
# Usage:
#       gdeploy -c backend-setup-generic.conf
#
# This configuration creates backend for GlusterFS clusters
#

[hosts]
10.70.46.130
10.70.46.32
10.70.46.110
10.70.46.77

# Backend setup for all the nodes in the `hosts' section. This will create
# PV, VG, and LV with gdeploy generated names.
[backend-setup]
devices=vdb
Specific.
If the disks names vary across the machines in the cluster then backend setup can be written for specific machines with specific disk names. gdeploy is quite flexible in allowing to do host specific setup in a single configuration file.
For more information on possible values, see Configuration File
Example configuration file: backend-setup-hostwise.conf
#
# Usage:
#       gdeploy -c backend-setup-hostwise.conf
#
# This configuration creates backend for GlusterFS clusters
#

[hosts]
10.70.46.130
10.70.46.32
10.70.46.110
10.70.46.77

# Backend setup for 10.70.46.77 with default gdeploy generated names for
# Volume Groups and Logical Volumes. Volume names will be GLUSTER_vg1,
# GLUSTER_vg2...
[backend-setup:10.70.46.77]
devices=vda,vdb

# Backend setup for remaining 3 hosts in the `hosts' section with custom names
# for Volumes Groups and Logical Volumes.
[backend-setup:10.70.46.{130,32,110}]
devices=vdb,vdc,vdd
vgs=vg1,vg2,vg3
pools=pool1,pool2,pool3
lvs=lv1,lv2,lv3
mountpoints=/mnt/data1,/mnt/data2,/mnt/data3
brick_dirs=/mnt/data1/1,/mnt/data2/2,/mnt/data3/3
Creating Backend by Setting up PV, VG, and LV
If the user needs more control over setting up the backend, then pv, vg, and lv can be created individually. LV module provides flexibility to create more than one LV on a VG. For example, the `backend-setup’ module setups up a thin-pool by default and applies default performance recommendations. However, if the user has a different use case which demands more than one LV, and a combination of thin and thick pools then `backend-setup’ is of no help. The user can use PV, VG, and LV modules to achieve this.
For more information on possible values, see Configuration File
The below example shows how to create four logical volumes on a single volume group. The examples shows a mix of thin and thickpool LV creation.
[hosts]
10.70.46.130
10.70.46.32

[pv]
action=create
devices=vdb

[vg1]
action=create
vgname=RHS_vg1
pvname=vdb

[lv1]
action=create
vgname=RHS_vg1
lvname=engine_lv
lvtype=thick
size=10GB
mount=/rhgs/brick1

[lv2]
action=create
vgname=RHS_vg1
poolname=lvthinpool
lvtype=thinpool
poolmetadatasize=10MB
chunksize=1024k
size=30GB

[lv3]
action=create
lvname=lv_vmaddldisks
poolname=lvthinpool
vgname=RHS_vg1
lvtype=thinlv
mount=/rhs/brick2
virtualsize=9GB

[lv4]
action=create
lvname=lv_vmrootdisks
poolname=lvthinpool
vgname=RHS_vg1
size=19GB
lvtype=thinlv
mount=/rhs/brick3
virtualsize=19GB
Example to extend an existing VG:
#
# Extends a given given VG. pvname and vgname is mandatory, in this example the
# vg `RHS_vg1' is extended by adding pv, vdd. If the pv is not alreay present, it
# is created by gdeploy.
#
[hosts]
10.70.46.130
10.70.46.32

[vg2]
action=extend
vgname=RHS_vg1
pvname=vdd
Creating Volumes
Setting up volume involves writing long commands by choosing the hostname/IP and brick order carefully and this could be error prone. gdeploy helps in simplifying this task. When gdeploy is installed, a sample configuration file will be created at:
/usr/share/doc/ansible/gdeploy/examples/gluster.conf.sample
For example, for a basic trusted storage pool of a 2 x 2 replicate volume the configuration details in the configuration file will be as follows:
[hosts]
10.0.0.1
10.0.0.2
10.0.0.3
10.0.0.4

[volume]
action=create
volname=glustervol
transport=tcp,rdma
replica=yes
replica_count=2
force=yes
For more information on possible values, see Configuration File
After modifying the configuration file, invoke the configuration using the command:
# gdeploy -c conf.txt
Creating Multiple Volumes.
Note
Support of creating multiple volumes only from gdeploy 2.0, please check your gdeploy version before trying this configuration.
While creating multiple volumes in a single configuration, the [volume] modules should be numbered. For example, if there are two volumes they will be numbered [volume1], [volume2]
vol-create.conf
[hosts]
10.70.46.130
10.70.46.32

[backend-setup]
devices=vdb,vdc
mountpoints=/mnt/data1,/mnt/data2

[volume1]
action=create
volname=vol-one
transport=tcp
replica=yes
replica_count=2
brick_dirs=/mnt/data1/1

[volume2]
action=create
volname=vol-two
transport=tcp
replica=yes
replica_count=2
brick_dirs=/mnt/data2/2
With gdeploy 2.0, a volume can be created with multiple volume options set. Number of keys should match number of values.
[hosts]
10.70.46.130
10.70.46.32

[backend-setup]
devices=vdb,vdc
mountpoints=/mnt/data1,/mnt/data2

[volume1]
action=create
volname=vol-one
transport=tcp
replica=yes
replica_count=2
key=group,storage.owner-uid,storage.owner-gid,features.shard,features.shard-block-size,performance.low-prio-threads,cluster.data-self-heal-algorithm
value=virt,36,36,on,512MB,32,full
brick_dirs=/mnt/data1/1

[volume2]
action=create
volname=vol-two
transport=tcp
replica=yes
key=group,storage.owner-uid,storage.owner-gid,features.shard,features.shard-block-size,performance.low-prio-threads,cluster.data-self-heal-algorithm
value=virt,36,36,on,512MB,32,full
replica_count=2
brick_dirs=/mnt/data2/2
The above configuration will create two volumes with multiple volume options set.
Mounting Clients
When mounting clients, instead of logging into every client which has to be mounted, gdeploy can be used to mount clients remotely. When gdeploy is installed, a sample configuration file will be created at:
/usr/share/doc/ansible/gdeploy/examples/gluster.conf.sample
Following is an example of the modifications to the configuration file in order to mount clients:
[clients]
action=mount
hosts=10.70.46.159
fstype=glusterfs
client_mount_points=/mnt/gluster
volname=10.0.0.1:glustervol
Note
If the
fstypeis NFS, then mention it as nfs-version. By default it is 3.
For more information on possible values, see Configuration File
After modifying the configuration file, invoke the configuration using the command:
# gdeploy -c conf.txt
Configuring a Volume
The volumes can be configured using the configuration file. The volumes can be configured remotely using the configuration file without having to log into the trusted storage pool. For more information regarding the sections and options in the configuration file, see Configuration File
Adding and Removing a Brick
The configuration file can be modified to add or remove a brick:
Adding a Brick.
Modify the [volume] section in the configuration file to add a brick. For example:
[volume]
action=add-brick
volname=10.0.0.1:glustervol
bricks=10.0.0.1:/mnt/new_brick
After modifying the configuration file, invoke the configuration using the command:
# gdeploy -c conf.txt
Removing a Brick.
Modify the [volume] section in the configuration file to remove a brick. For example:
[volume]
action=remove-brick
volname=10.0.0.1:glustervol
bricks=10.0.0.2:/mnt/brick
state=commit
Other options for state are stop, start, and force.
After modifying the configuration file, invoke the configuration using the command:
# gdeploy -c conf.txt
For more information on possible values, see Configuration File
Rebalancing a Volume
Modify the [volume] section in the configuration file to rebalance a volume. For example:
[volume]
action=rebalance
volname=10.70.46.13:glustervol
state=start
Other options for state are stop, and fix-layout.
After modifying the configuration file, invoke the configuration using the command:
# gdeploy -c conf.txt
For more information on possible values, see Configuration File
Starting, Stopping, or Deleting a Volume
The configuration file can be modified to start, stop, or delete a volume:
Starting a Volume.
Modify the [volume] section in the configuration file to start a volume. For example:
[volume]
action=start
volname=10.0.0.1:glustervol
After modifying the configuration file, invoke the configuration using the command:
# gdeploy -c conf.txt
Stopping a Volume.
Modify the [volume] section in the configuration file to start a volume. For example:
[volume]
action=stop
volname=10.0.0.1:glustervol
After modifying the configuration file, invoke the configuration using the command:
# gdeploy -c conf.txt
Deleting a Volume.
Modify the [volume] section in the configuration file to start a volume. For example:
[volume]
action=delete
volname=10.70.46.13:glustervol
After modifying the configuration file, invoke the configuration using the command:
# gdeploy -c conf.txt
For more information on possible values, see Configuration File
Configuration File
The configuration file includes the various options that can be used to change the settings for gdeploy. The following options are currently supported:
With the new release of gdeploy the configuration file has added many more sections and has enhanced the variables in the existing sections.
-
[hosts]
-
[devices]
-
[disktype]
-
[diskcount]
-
[stripesize]
-
[vgs]
-
[pools]
-
[lvs]
-
[mountpoints]
-
{host-specific-data-for-above}
-
[clients]
-
[volume]
-
[backend-setup]
-
[pv]
-
[vg]
-
[lv]
-
[RH-subscription]
-
[yum]
-
[shell]
-
[update-file]
-
[service]
-
[script]
-
[firewalld]
The options are briefly explained in the following list:
-
hosts.
This is a mandatory section which contains the IP address or hostname of the machines in the trusted storage pool. Each hostname or IP address should be listed in a separate line.
For example:
[hosts]
10.0.0.1
10.0.0.2
-
devices.
This is a generic section and is applicable to all the hosts listed in the [hosts] section. However, if sections of hosts such as the [hostname] or [IP-address] is present, then the data in the generic sections like [devices] is ignored. Host specific data take precedence. This is an optional section.
For example:
[devices]
/dev/sda
/dev/sdb
Note
When configuring the backend setup, the devices should be either listed in this section or in the host specific section.
-
disktype.
This section specifies the disk configuration that is used while setting up the backend. gdeploy supports RAID 10, RAID 6, and JBOD configurations. This is an optional section and if the field is left empty, JBOD is taken as the default configuration.
For example:
[disktype]
raid6
-
diskcount.
This section specifies the number of data disks in the setup. This is a mandatory field if the [disktype] specified is either RAID 10 or RAID 6. If the [disktype] is JBOD the [diskcount] value is ignored. This is a host specific data.
For example:
[diskcount]
10
-
stripesize.
This section specifies the stripe_unit size in KB.
Case 1: This field is not necessary if the [disktype] is JBOD, and any given value will be ignored.
Case 2: This is a mandatory field if [disktype] is specified as RAID 6.
For [disktype] RAID 10, the default value is taken as 256KB. If you specify any other value the following warning is displayed:
"Warning: We recommend a stripe unit size of 256KB for RAID 10"
Note
Do not add any suffixes like K, KB, M, etc. This is host specific data and can be added in the hosts section.
For example:
[stripesize]
128
-
vgs.
This section is deprecated in gdeploy 2.0. Please see [backend-setup] for more details for gdeploy 2.0. This section specifies the volume group names for the devices listed in [devices]. The number of volume groups in the [vgs] section should match the one in [devices]. If the volume group names are missing, the volume groups will be named as GLUSTER_vg\{1, 2, 3, …} as default.
For example:
[vgs]
CUSTOM_vg1
CUSTOM_vg2
-
pools.
This section is deprecated in gdeploy 2.0. Please see [backend-setup] for more details for gdeploy 2.0. This section specifies the pool names for the volume groups specified in the [vgs] section. The number of pools listed in the [pools] section should match the number of volume groups in the [vgs] section. If the pool names are missing, the pools will be named as GLUSTER_pool\{1, 2, 3, …}.
For example:
[pools]
CUSTOM_pool1
CUSTOM_pool2
-
lvs.
This section is deprecated in gdeploy 2.0. Please see [backend-setup] for more details for gdeploy 2.0. This section provides the logical volume names for the volume groups specified in [vgs]. The number of logical volumes listed in the [lvs] section should match the number of volume groups listed in [vgs]. If the logical volume names are missing, it is named as GLUSTER_lv\{1, 2, 3, …}.
For example:
[lvs]
CUSTOM_lv1
CUSTOM_lv2
-
mountpoints.
This section is deprecated in gdeploy 2.0. Please see [backend-setup] for more details for gdeploy 2.0. This section specifies the brick mount points for the logical volumes. The number of mount points should match the number of logical volumes specified in [lvs] If the mount points are missing, the mount points will be names as /gluster/brick\{1, 2, 3…}.
For example:
[mountpoints]
/rhs/mnt1
/rhs/mnt2
-
brick_dirs.
This section is deprecated in gdeploy 2.0. Please see [backend-setup] for more details for gdeploy 2.0. This is the directory which will be used as a brick while creating the volume. A mount point cannot be used as a brick directory, hence brick_dir should be a directory inside the mount point.
This field can be left empty, in which case a directory will be created inside the mount point with a default name. If the backend is not setup, then this field will be ignored. In case mount points have to be used as brick directory, then use the force option in the volume section.
Important
If you only want to create a volume and not setup the back-end, then provide the absolute path of brick directories for each host specified in the [hosts] section under this section along with the volume section.
For example:
[brick_dirs]
/mnt/rhgs/brick1
/mnt/rhgs/brick2
-
host-specific-data.
This section is deprecated in gdeploy 2.0. Please see [backend-setup] for more details for gdeploy 2.0. For the hosts (IP/hostname) listed under [hosts] section, each host can have its own specific data. The following are the variables that are supported for hosts.
* devices - List of devices to use
* vgs - Custom volume group names
* pools - Custom pool names
* lvs - Custom logical volume names
* mountpoints - Mount points for the logical names
* brick_dirs - This is the directory which will be used as a brick while creating the volume
For example:
[10.0.01]
devices=/dev/vdb,/dev/vda
vgs=CUSTOM_vg1,CUSTOM_vg2
pools=CUSTOM_pool1,CUSTOM_pool1
lvs=CUSTOM_lv1,CUSTOM_lv2
mountpoints=/rhs/mount1,/rhs/mount2
brick_dirs=brick1,brick2
-
peer.
This section specifies the configurations for the Trusted Storage Pool management (TSP). This section helps in making all the hosts specified in the [hosts] section to either probe each other to create the trusted storage pool or detach all of them from the trusted storage pool. The only option in this section is the option names 'manage' which can have it’s values to be either probe or detach.
For example:
[peer]
manage=probe
-
clients.
This section specifies the client hosts and client_mount_points to mount the gluster storage volume created. The 'action' option is to be specified for the framework to determine the action that has to be performed. The options are 'mount' and 'unmount'. The Client hosts field is mandatory. If the mount points are not specified, default will be taken as /mnt/gluster for all the hosts.
The option fstype specifies how the gluster volume is to be mounted. Default is glusterfs (FUSE mount). The volume can also be mounted as NFS. Each client can have different types of volume mount, which has to be specified with a comma separated. The following fields are included:
* action
* hosts
* fstype
* client_mount_points
For example:
[clients]
action=mount
hosts=10.0.0.10
fstype=nfs
nfs-version=3
client_mount_points=/mnt/rhs
-
volume.
The section specifies the configuration options for the volume. The following fields are included in this section:
* action
* volname
* transport
* replica
* replica_count
* disperse
* disperse_count
* redundancy_count
* force
-
action.
This option specifies what action must be performed in the volume. The choices can be [create, delete, add-brick, remove-brick].
create: This choice is used to create a volume.
delete: If the delete choice is used, all the options other than 'volname' will be ignored.
add-brick or remove-brick: If the add-brick or remove-brick is chosen, extra option bricks with a comma separated list of brick names(in the format <hostname>:<brick path> should be provided. In case of remove-brick, state option should also be provided specifying the state of the volume after brick removal.
-
volname.
This option specifies the volume name. Default name is glustervol
Note
-
In case of a volume operation, the 'hosts' section can be omitted, provided volname is in the format <hostname>:<volname>, where hostname is the hostname / IP of one of the nodes in the cluster
-
Only single volume creation/deletion/configuration is supported.
-
-
transport.
This option specifies the transport type. Default is tcp. Options are tcp or rdma or tcp,rdma.
-
replica.
This option will specify if the volume should be of type replica. options are yes and no. Default is no. If 'replica' is provided as yes, the 'replica_count' should be provided.
-
disperse.
This option specifies if the volume should be of type disperse. Options are yes and no. Default is no.
-
disperse_count.
This field is optional even if 'disperse' is yes. If not specified, the number of bricks specified in the command line is taken as the disperse_count value.
-
redundancy_count.
If this value is not specified, and if 'disperse' is yes, it’s default value is computed so that it generates an optimal configuration.
-
force.
This is an optional field and can be used during volume creation to forcefully create the volume.
For example:
[volname]
action=create
volname=glustervol
transport=tcp,rdma
replica=yes
replica_count=3
force=yes
-
-
backend-setup.
Available in gdeploy 2.0. This section sets up the backend for using with GlusterFS volume. If more than one backend-setup has to be done, they can be done by numbering the section like [backend-setup1], [backend-setup2], …
backend-setup section supports the following variables: ** devices: This replaces the [pvs] section in gdeploy 1.x. devices variable lists the raw disks which should be used for backend setup. For example:
+
[backend-setup]
devices=sda,sdb,sdc
+ This is a mandatory field.
-
vgs: This is an optional variable. This variable replaces the [vgs] section in gdeploy 1.x. vgs variable lists the names to be used while creating volume groups. The number of VG names should match the number of devices or should be left blank. gdeploy will generate names for the VGs. For example:
[backend-setup]
devices=sda,sdb,sdc
vgs=custom_vg1,custom_vg2,custom_vg3
A pattern can be provided for the vgs like custom_vg\{1..3}, this will create three vgs.
[backend-setup] devices=sda,sdb,sdc vgs=custom_vg{1..3} -
pools: This is an optional variable. The variable replaces the [pools] section in gdeploy 1.x. pools lists the thin pool names for the volume.
[backend-setup]
devices=sda,sdb,sdc
vgs=custom_vg1,custom_vg2,custom_vg3
pools=custom_pool1,custom_pool2,custom_pool3
Similar to vg, pattern can be provided for thin pool names. For example custom_pool\{1..3}
-
lvs: This is an optional variable. This variable replaces the [lvs] section in gdeploy 1.x. lvs lists the logical volume name for the volume.
[backend-setup]
devices=sda,sdb,sdc
vgs=custom_vg1,custom_vg2,custom_vg3
pools=custom_pool1,custom_pool2,custom_pool3
lvs=custom_lv1,custom_lv2,custom_lv3
Patterns for LV can be provided similar to vg. For example custom_lv\{1..3}.
-
mountpoints: This variable deprecates the [mountpoints] section in gdeploy 1.x. Mountpoints lists the mount points where the logical volumes should be mounted. Number of mount points should be equal to the number of logical volumes. For example:
[backend-setup]
devices=sda,sdb,sdc
vgs=custom_vg1,custom_vg2,custom_vg3
pools=custom_pool1,custom_pool2,custom_pool3
lvs=custom_lv1,custom_lv2,custom_lv3
mountpoints=/gluster/data1,/gluster/data2,/gluster/data3
-
ssd - This variable is set if caching has to be added. For example, the backed setup with ssd for caching should be:
[backend-setup]
ssd=sdc
vgs=RHS_vg1
datalv=lv_data
chachedatalv=lv_cachedata:1G
chachemetalv=lv_cachemeta:230G
Note
Specifying the name of the data LV is necessary while adding SSD. Make sure the datalv is created already. Otherwise ensure to create it in one of the earlier `backend-setup’ sections.
-
-
PV.
Available in gdeploy 2.0. If the user needs to have more control over setting up the backend, and does not want to use backend-setup section, then pv, vg, and lv modules are to be used. The pv module supports the following variables. action: Supports two values `create’ and `resize’ devices: The list of devices to use for pv creation.
+ `action’ and `devices’ variables are mandatory. When `resize’ value is used for action then we have two more variables `expand’ and `shrink’ which can be set. Please see below for examples.
+ Example 1: Creating a few physical volumes
+
[pv]
action=create
devices=vdb,vdc,vdd
+ Example 2: Creating a few physical volumes on a host
+
[pv:10.0.5.2]
action=create
devices=vdb,vdc,vdd
+ Example 3: Expanding an already created pv
+
[pv]
action=resize
devices=vdb
expand=yes
+ Example 4: Shrinking an already created pv
+
[pv]
action=resize
devices=vdb
shrink=100G
-
VG.
Available in gdeploy 2.0. This module is used to create and extend volume groups. The vg module supports the following variables. action - Action can be one of create or extend. pvname - PVs to use to create the volume. For more than one PV use comma separated values. vgname - The name of the vg. If no name is provided GLUSTER_vg will be used as default name. one-to-one - If set to yes, one-to-one mapping will be done between pv and vg.
+ If action is set to extend, the vg will be extended to include pv provided.
+ Example1: Create a vg named images_vg with two PVs
+
[vg]
action=create
vgname=images_vg
pvname=sdb,sdc
+ Example2: Create two vgs named rhgs_vg1 and rhgs_vg2 with two PVs
+
[vg]
action=create
vgname=rhgs_vg
pvname=sdb,sdc
one-to-one=yes
+ Example3: Extend an existing vg with the given disk.
+
[vg]
action=extend
vgname=rhgs_images
pvname=sdc
-
LV.
Available in gdeploy 2.0. This module is used to create, setup-cache, and convert logical volumes. The lv module supports the following variables:
action - The action variable allows three values `create’, `setup-cache’, `convert’, and `change’. If the action is 'create', the following options are supported: lvname: The name of the logical volume, this is an optional field. Default is GLUSTER_lv poolname - Name of the thinpool volume name, this is an optional field. Default is GLUSTER_pool lvtype - Type of the logical volume to be created, allowed values are `thin’ and `thick’. This is an optional field, default is thick. size - Size of the logical volume volume. Default is to take all available space on the vg. extent - Extent size, default is 100%FREE force - Force lv create, do not ask any questions. Allowed values `yes’, `no’. This is an optional field, default is yes. vgname - Name of the volume group to use. pvname - Name of the physical volume to use. chunksize - Size of chunk for snapshot. poolmetadatasize - Sets the size of pool’s metadata logical volume. virtualsize - Creates a thinly provisioned device or a sparse device of the given size mkfs - Creates a filesystem of the given type. Default is to use xfs. mkfs-opts - mkfs options. mount - Mount the logical volume.
+ If the action is setup-cache, the below options are supported:
-
ssd - Name of the ssd device. For example sda/vda/ … to setup cache.
-
vgname - Name of the volume group.
-
poolname - Name of the pool.
-
cache_meta_lv - Due to requirements from dm-cache (the kernel driver), LVM further splits the cache pool LV into two devices - the cache data LV and cache metadata LV. Provide the cache_meta_lv name here.
-
cache_meta_lvsize - Size of the cache meta lv.
-
cache_lv - Name of the cache data lv.
-
cache_lvsize - Size of the cache data.
-
force - Force
If the action is convert, the below options are supported:
-
lvtype - type of the lv, available options are thin and thick
-
force - Force the lvconvert, default is yes.
-
vgname - Name of the volume group.
-
poolmetadata - Specifies cache or thin pool metadata logical volume.
-
cachemode - Allowed values writeback, writethrough. Default is writethrough.
-
cachepool - This argument is necessary when converting a logical volume to a cache LV. Name of the cachepool.
-
lvname - Name of the logical volume.
-
chunksize - Gives the size of chunk for snapshot, cache pool and thin pool logical volumes. Default unit is in kilobytes.
-
poolmetadataspare - Controls creation and maintanence of pool metadata spare logical volume that will be used for automated pool recovery.
-
thinpool - Specifies or converts logical volume into a thin pool’s data volume. Volume’s name or path has to be given.
If the action is change, the below options are supported:
-
lvname - Name of the logical volume.
-
vgname - Name of the volume group.
-
zero - Set zeroing mode for thin pool.
Example 1: Create a thin LV
[lv]
action=create
vgname=RHGS_vg1
poolname=lvthinpool
lvtype=thinpool
poolmetadatasize=10MB
chunksize=1024k
size=30GB
Example 2: Create a thick LV
[lv]
action=create
vgname=RHGS_vg1
lvname=engine_lv
lvtype=thick
size=10GB
mount=/rhgs/brick1
If there are more than one LVs, then the LVs can be created by numbering the LV sections, like [lv1], [lv2] …
-
-
RH-subscription.
Available in gdeploy 2.0. This module is used to subscribe, unsubscribe, attach, enable repos etc. The RH-subscription module allows the following variables:
This module is used to subscribe, unsubscribe, attach, enable repos etc. The RH-subscription module allows the following variables:
If the action is register, the following options are supported: username/activationkey: Username or activationkey. password/activationkey: Password or activation key auto-attach: true/false pool: Name of the pool. repos: Repos to subscribe to. disable-repos: Repo names to disable. Leaving this option blank will disable all the repos. If the action is attach-pool**the following options are supported:
+ pool - Pool name to be attached.
-
If the action is enable-repos the following options are supported:
repos - List of comma separated repos that are to be subscribed to.
-
If the action is disable-repos the following options are supported:
repos - List of comma separated repos that are to be subscribed to.
-
If the action is unregister the systems will be unregistered.
Example 1: Subscribe to Red Hat Subscription network:
[RH-subscription1]
action=register
username=qa@redhat.com
password=<passwd>
pool=<pool>
Example 2: Disable all the repos:
[RH-subscription2]
action=disable-repos
repos=
Example 3: Enable a few repos
[RH-subscription3]
action=enable-repos
repos=rhel-7-server-rpms,rh-gluster-3-for-rhel-7-server-rpms,rhel-7-server-rhev-mgmt-agent-rpms
-
-
yum.
Available in gdeploy 2.0. This module is used to install or remove rpm packages, with the yum module we can add repos as well during the install time.
The action variable allows two values `install’ and `remove’.
If the action is install the following options are supported: packages - Comma separated list of packages that are to be installed. repos - The repositories to be added. gpgcheck - yes/no values have to be provided. update - Whether yum update has to be initiated.
+ If the action is remove then only one option has to be provided:
-
remove - The comma separated list of packages to be removed.
For example
[yum1]
action=install
gpgcheck=no
# Repos should be an url; eg: http://repo-pointing-glusterfs-builds
repos=<glusterfs.repo>,<vdsm.repo>
packages=vdsm,vdsm-gluster,ovirt-hosted-engine-setup,screen,gluster-nagios-addons,xauth
update=yes
Install a package on a particular host.
[yum2:host1]
action=install
gpgcheck=no
packages=rhevm-appliance
-
-
shell.
Available in gdeploy 2.0. This module allows user to run shell commands on the remote nodes.
Currently shell provides a single action variable with value execute. And a command variable with any valid shell command as value.
The below command will execute vdsm-tool on all the nodes.
[shell]
action=execute
command=vdsm-tool configure --force
-
update-file.
Available in gdeploy 2.0. update-file module allows users to copy a file, edit a line in a file, or add new lines to a file. action variable can be any of copy, edit, or add.
When the action variable is set to copy, the following variables are supported. src - The source path of the file to be copied from. dest - The destination path on the remote machine to where the file is to be copied to.
+ When the action variable is set to edit, the following variables are supported.
-
dest - The destination file name which has to be edited.
-
replace - A regular expression, which will match a line that will be replaced.
-
line - Text that has to be replaced.
When the action variable is set to add, the following variables are supported.
-
dest - File on the remote machine to which a line has to be added.
-
line - Line which has to be added to the file. Line will be added towards the end of the file.
Example 1: Copy a file to a remote machine.
[update-file]
action=copy
src=/tmp/foo.cfg
dest=/etc/nagios/nrpe.cfg
Example 2: Edit a line in the remote machine, in the below example lines that have allowed_hosts will be replaced with allowed_hosts=host.redhat.com
[update-file]
action=edit
dest=/etc/nagios/nrpe.cfg
replace=allowed_hosts
line=allowed_hosts=host.redhat.com
Example 3: Add a line to the end of a file
[update-file]
action=add
dest=/etc/ntp.conf
line=server clock.redhat.com iburst
-
-
service.
Available in gdeploy 2.0. The service module allows user to start, stop, restart, reload, enable, or disable a service. The action variable specifies these values.
When action variable is set to any of start, stop, restart, reload, enable, disable the variable servicename specifies which service to start, stop etc. ** service - Name of the service to start, stop etc.
+ Example: enable and start ntp daemon.
+
[service1]
action=enable
service=ntpd
+
[service2]
action=restart
service=ntpd
-
script.
Available in gdeploy 2.0. script module enables user to execute a script/binary on the remote machine. action variable is set to execute. Allows user to specify two variables file and args. file - An executable on the local machine. args - Arguments to the above program.
+ Example: Execute script disable-multipath.sh on all the remote nodes listed in `hosts’ section.
+
[script]
action=execute
file=/usr/share/ansible/gdeploy/scripts/disable-multipath.sh
-
firewalld.
Available in gdeploy 2.0. firewalld module allows the user to manipulate firewall rules. action variable supports two values `add’ and `delete’. Both add and delete support the following variables: ports/services - The ports or services to add to firewall. permanent - Whether to make the entry permanent. Allowed values are true/false ** zone - Default zone is public
+ For example:
+
[firewalld]
action=add
ports=111/tcp,2049/tcp,54321/tcp,5900/tcp,5900-6923/tcp,5666/tcp,16514/tcp
services=glusterfs
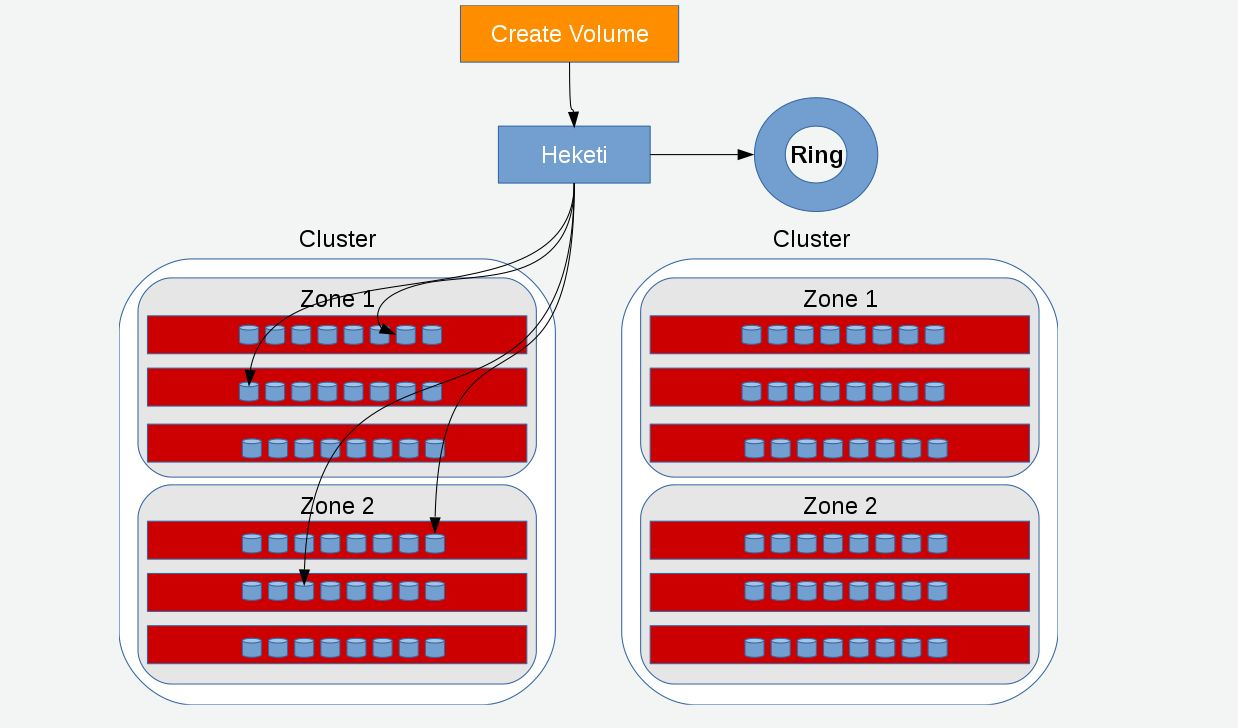
Managing Volumes using Heketi
Heketi provides a RESTful management interface which can be used to manage the lifecycle of GlusterFS volumes. With Heketi, cloud services like OpenStack Manila, Kubernetes, and OpenShift can dynamically provision GlusterFS volumes with any of the supported durability types. Heketi will automatically determine the location for bricks across the cluster, making sure to place bricks and its replicas across different failure domains. Heketi also supports any number of GlusterFS clusters, allowing cloud services to provide network file storage without being limited to a single GlusterFS cluster.
With Heketi, the administrator no longer manages or configures bricks, disks, or trusted storage pools. Heketi service will manage all hardware for the administrator, enabling it to allocate storage on demand. Any disks registered with Heketi must be provided in raw format, which will then be managed by it using LVM on the disks provided.
Heketi can be configured and executed using the CLI or the API. The sections ahead describe configuring Heketi using the CLI. For more information regarding the Heketi API, see Heketi API.
Prerequisites
Heketi requires SSH access to the nodes that it will manage. Hence, ensure that the following requirements are met:
-
SSH Access.
-
SSH user and public key must be setup on the node.
-
SSH user must have password-less sudo.
-
Must be able to run sudo commands from SSH. This requires disabling
requirettyin the/etc/sudoersfile
-
-
Start the glusterd service after GlusterFS is installed.
-
Disks registered with Heketi must be in the raw format.
Installing Heketi
After installing GlusterFS 3.1.2, execute the following command to install Heketi:
# yum install heketi
For more information about subscribing to the required channels and installing GlusterFS, see the GlusterFS Installation Guide.
Starting the Heketi Server
Before starting the server, ensure that the following prerequisites are met:
-
Generate the passphrase-less SSH keys for the nodes which are going to be part of the trusted storage pool by running the following command:
# ssh-keygen -f id_rsa -t rsa -N ''
-
Set up password-less SSH access between Heketi and the GlusterFS servers by running the following command:
# ssh-copy-id -i root@server
-
Setup the heketi.json configuration file. The file is located in /etc/heketi/heketi.json. The configuration file has the information required to run the Heketi server. The config file must be in JSON format with the following settings:
-
port: string, Heketi REST service port number
-
use_auth: bool, Enable JWT Authentication
-
jwt: map, JWT Authentication settings
-
admin: map, Settings for the Heketi administrator
-
key: string,
-
user: map, Settings for the Heketi volume requests access user
-
key: string, t
-
-
-
glusterfs: map, GlusterFS settings
-
executor: string, Determines the type of command executor to use. Possible values are:
-
mock: Does not send any commands out to servers. Can be used for development and tests
-
ssh: Sends commands to real systems over ssh
-
-
db: string, Location of Heketi database
-
sshexec: map, SSH configuration
-
keyfile: string, File with private ssh key
-
user: string, SSH user
Following is an example of the JSON file:
{
  "_port_comment": "Heketi Server Port Number",
  "port": "8080",

  "_use_auth": "Enable JWT authorization. Please enable for deployment",
  "use_auth": false,

  "_jwt": "Private keys for access",
  "jwt": {
    "_admin": "Admin has access to all APIs",
    "admin": {
      "key": "My Secret"
    },
    "_user": "User only has access to /volumes endpoint",
    "user": {
      "key": "My Secret"
    }
  },

.....
Note
The location for the private SSH key that is created must be set in the
keyfilesetting of the configuration file, and the key should be readable by the heketi user.Advanced Options.
The following configuration options should only be set on advanced configurations.
-
-
-
brick_max_size_gb: int, Maximum brick size (Gb)
-
brick_min_size_gb: int, Minimum brick size (Gb)
-
max_bricks_per_volume: int, Maximum number of bricks per volume
-
Starting the Server
For Red Hat Enterprise Linux 7.
-
Enable heketi by executing the following command:
# systemctl enable heketi
-
Start the Heketi server, by executing the following command:
# systemctl start heketi
-
To check the status of the Heketi server, execute the following command:
# systemctl status heketi
-
To check the logs, execute the following command:
# journalctl -u heketi
For Red Hat Enterprise Linux 6.
-
To start Heketi, execute the following command:
# chkconfig --add heketi
# service heketi start
-
Check the logs by executing the following command:
# less /var/log/heketi
Note
The database will be installed in /var/lib/heketi.
Verifying the Configuration
To verify if the server is running, execute the following step:
If Heketi is not setup with authentication, then use curl to verify the configuration:
# curl http://<server:port>/hello
You can also verify the configuration using the heketi-cli when authentication is enabled:
# heketi-cli -server http://<server:port> -user <user> -secret <secret> cluster list
Setting up the Topology
Setting up the topology allows Heketi to determine which nodes, disks, and clusters to use.
Prerequisites
You have to determine the node failure domains and clusters of nodes. Failure domains is a value given to a set of nodes which share the same switch, power supply, or anything else that would cause them to fail at the same time. Heketi uses this information to make sure that replicas are created across failure domains, thus providing cloud services volumes which are resilient to both data unavailability and data loss.
You have to determine which nodes would constitute a cluster. Heketi supports multiple GlusterFS clusters, which gives cloud services the option of specifying a set of clusters where a volume must be created. This provides cloud services and administrators the option of creating SSD, SAS, SATA, or any other type of cluster which provide a specific quality of service to users.
Topology Setup
The command line client loads the information about creating a cluster, adding nodes to that cluster, and then adding disks to each one of those nodes.This information is added into the topology file. To load a topology file with heketi-cli, execute the following command:
# export HEKETI_CLI_SERVER=http://<heketi_server:port>
# heketi-cli load -json=<topology_file>
Where topology_file is a file in JSON format describing the clusters,
nodes, and disks to add to Heketi. The format of the file is as follows:
clusters: array of clusters, Array of clusters
-
Each element on the array is a map which describes the cluster as follows
-
nodes: array of nodes, Array of nodes in a cluster
Each element on the array is a map which describes the node as follows * node: map, Same map as Node Add except there is no need to supply the cluster id. * devices: array of strings, Name of each disk to be added
-
For example:
-
Topology file:
{ "clusters": [ { "nodes": [ { "node": { "hostnames": { "manage": [ "10.0.0.1" ], "storage": [ "10.0.0.1" ] }, "zone": 1 }, "devices": [ "/dev/sdb", "/dev/sdc", "/dev/sdd", "/dev/sde", "/dev/sdf", "/dev/sdg", "/dev/sdh", "/dev/sdi" ] }, { "node": { "hostnames": { "manage": [ "10.0.0.2" ], "storage": [ "10.0.0.2" ] }, "zone": 2 }, "devices": [ "/dev/sdb", "/dev/sdc", "/dev/sdd", "/dev/sde", "/dev/sdf", "/dev/sdg", "/dev/sdh", "/dev/sdi" ] }, ...... ...... -
Load the Heketi JSON file:
# heketi-cli load -json=topology_libvirt.json Creating cluster ... ID: a0d9021ad085b30124afbcf8df95ec06 Creating node 192.168.10.100 ... ID: b455e763001d7903419c8ddd2f58aea0 Adding device /dev/vdb ... OK Adding device /dev/vdc ... OK ……. Creating node 192.168.10.101 ... ID: 4635bc1fe7b1394f9d14827c7372ef54 Adding device /dev/vdb ... OK Adding device /dev/vdc ... OK …………. -
Execute the following command to check the details of a particular node:
# heketi-cli node info b455e763001d7903419c8ddd2f58aea0
Node Id: b455e763001d7903419c8ddd2f58aea0
Cluster Id: a0d9021ad085b30124afbcf8df95ec06
Zone: 1
Management Hostname: 192.168.10.100
Storage Hostname: 192.168.10.100
Devices:
Id:0ddba53c70537938f3f06a65a4a7e88b   Name:/dev/vdi            Size (GiB):499     Used (GiB):0       Free (GiB):499
Id:4fae3aabbaf79d779795824ca6dc433a   Name:/dev/vdg            Size (GiB):499     Used (GiB):0       Free (GiB):499
…………….
-
Execute the following command to check the details of the cluster:
# heketi-cli cluster info a0d9021ad085b30124afbcf8df95ec06
Cluster id: a0d9021ad085b30124afbcf8df95ec06
Nodes:
4635bc1fe7b1394f9d14827c7372ef54
802a3bfab2d0295772ea4bd39a97cd5e
b455e763001d7903419c8ddd2f58aea0
ff9eeb735da341f8772d9415166b3f9d
Volumes:
-
To check the details of the device, execute the following command:
# heketi-cli device info 0ddba53c70537938f3f06a65a4a7e88b
Device Id: 0ddba53c70537938f3f06a65a4a7e88b
Name: /dev/vdi
Size (GiB): 499
Used (GiB): 0
Free (GiB): 499
Bricks:
Creating a Volume
After Heketi is set up, you can use the CLI to create a volume.
-
Execute the following command to check the various option for creating a volume:
# heketi-cli volume create [options]
-
For example: After setting up the topology file with two nodes on one failure domain, and two nodes in another failure domain, create a 100Gb volume using the following command:
# heketi-cli volume create -size=100
Name: vol_0729fe8ce9cee6eac9ccf01f84dc88cc
Size: 100
Id: 0729fe8ce9cee6eac9ccf01f84dc88cc
Cluster Id: a0d9021ad085b30124afbcf8df95ec06
Mount: 192.168.10.101:vol_0729fe8ce9cee6eac9ccf01f84dc88cc
Mount Options: backupvolfile-servers=192.168.10.100,192.168.10.102
Durability Type: replicate
Replica: 3
Snapshot: Disabled

Bricks:
Id: 8998961142c1b51ab82d14a4a7f4402d
Path: /var/lib/heketi/mounts/vg_0ddba53c70537938f3f06a65a4a7e88b/brick_8998961142c1b51ab82d14a4a7f4402d/brick
Size (GiB): 50
Node: b455e763001d7903419c8ddd2f58aea0
Device: 0ddba53c70537938f3f06a65a4a7e88b
 …………….
-
If you want to increase the storage capacity of a particular volume by 1TB, then execute the following command:
# heketi-cli volume expand -volume=0729fe8ce9cee6eac9ccf01f84dc88cc -expand-size=1024
Name: vol_0729fe8ce9cee6eac9ccf01f84dc88cc
Size: 1224
Id: 0729fe8ce9cee6eac9ccf01f84dc88cc
Cluster Id: a0d9021ad085b30124afbcf8df95ec06
Mount: 192.168.10.101:vol_0729fe8ce9cee6eac9ccf01f84dc88cc
Mount Options: backupvolfile-servers=192.168.10.100,192.168.10.102
Durability Type: replicate
Replica: 3
Snapshot: Disabled

Bricks:
Id: 0b53e8c0d8e2b1a3fa5701e3c876d532
Path: /var/lib/heketi/mounts/vg_0ddba53c70537938f3f06a65a4a7e88b/brick_0b53e8c0d8e2b1a3fa5701e3c876d532/brick
Size (GiB): 256
Node: b455e763001d7903419c8ddd2f58aea0
Device: 0ddba53c70537938f3f06a65a4a7e88b

.........
.........
-
To check the details of the device, execute the following command:
# heketi-cli device info 0ddba53c70537938f3f06a65a4a7e88b
Device Id: 0ddba53c70537938f3f06a65a4a7e88b
Name: /dev/vdi
Size (GiB): 499
Used (GiB): 201
Free (GiB): 298
Bricks:
Id:0f1766cc142f1828d13c01e6eed12c74   Size (GiB):50      Path: /var/lib/heketi/mounts/vg_0ddba53c70537938f3f06a65a4a7e88b/brick_0f1766cc142f1828d13c01e6eed12c74/brick
Id:5d944c47779864b428faa3edcaac6902   Size (GiB):50      Path: /var/lib/heketi/mounts/vg_0ddba53c70537938f3f06a65a4a7e88b/brick_5d944c47779864b428faa3edcaac6902/brick
Id:8998961142c1b51ab82d14a4a7f4402d   Size (GiB):50      Path: /var/lib/heketi/mounts/vg_0ddba53c70537938f3f06a65a4a7e88b/brick_8998961142c1b51ab82d14a4a7f4402d/brick
Id:a11e7246bb21b34a157e0e1fd598b3f9   Size (GiB):50      Path: /var/lib/heketi/mounts/vg_0ddba53c70537938f3f06a65a4a7e88b/brick_a11e7246bb21b34a157e0e1fd598b3f9/brick
Deleting a Volume
To delete a volume, execute the following command:
# heketi-cli volume delete <volname>
For example:
$ heketi-cli volume delete 0729fe8ce9cee6eac9ccf01f84dc88cc
Volume 0729fe8ce9cee6eac9ccf01f84dc88cc deleted
About Encrypted Disk
GlusterFS provides the ability to create bricks on encrypted devices to restrict data access. Encrypted bricks can be used to create GlusterFS volumes.
For information on creating encrypted disk, refer to the Disk Encryption Appendix of the Red Hat Enterprise Linux 6 Installation Guide.
Formatting and Mounting Bricks
To create a GlusterFS volume, specify the bricks that comprise the volume. After creating the volume, the volume must be started before it can be mounted.
Creating Bricks Manually
Important
Red Hat supports formatting a Logical Volume using the XFS file system on the bricks.
Creating a Thinly Provisioned Logical Volume
To create a thinly provisioned logical volume, proceed with the following steps:
-
Create a physical volume(PV) by using the
pvcreatecommand.For example:
pvcreate --dataalignment 1280K /dev/sdb
Here,
/dev/sdbis a storage device.Use the correct
dataalignmentoption based on your device. For more information, see Brick Configuration.Note
The device name and the alignment value will vary based on the device you are using.
-
Create a Volume Group (VG) from the PV using the
vgcreatecommand:For example:
vgcreate --physicalextentsize 1280K rhs_vg /dev/sdb
-
Create a thin-pool using the following commands:
lvcreate --thinpool VOLGROUP/thin_pool -L pool_sz --chuncksize chunk_sz --poolmetadatasize metadev_sz --zero n
For example:
lvcreate --thinpool rhs_vg/rhs_pool -L 2T --chunksize 1280K --poolmetadatasize 16G --zero n
To enhance the performance of GlusterFS, ensure you read [chap-Configuring_Gluster_for_Enhancing_Performance] chapter.
-
Create a thinly provisioned volume that uses the previously created pool by running the
lvcreatecommand with the-Vand-Toptions:lvcreate -V size -T volgroup/poolname -n volname
For example:
lvcreate -V 1G -T rhs_vg/rhs_pool -n rhs_lv
It is recommended that only one LV should be created in a thin pool.
Formatting and Mounting Bricks
Format bricks using the supported XFS configuration, mount the bricks, and verify the bricks are mounted correctly. To enhance the performance of GlusterFS, ensure you read Configuring GlusterFS for Enhancing Performance. before formatting the bricks.
Important
Snapshots are not supported on bricks formatted with external log devices. Do not use
-l logdev=deviceoption withmkfs.xfscommand for formatting the GlusterFS bricks.
-
Run
# mkfs.xfs -f -i size=512 -n size=8192 -d su=128K,sw=10 DEVICEto format the bricks to the supported XFS file system format. Here, DEVICE is the created thin LV. The inode size is set to 512 bytes to accommodate for the extended attributes used by GlusterFS. -
Run
# mkdir /mountpointto create a directory to link the brick to. -
Add an entry in
/etc/fstab:/dev/rhs_vg/rhs_lv /mountpoint xfs rw,inode64,noatime,nouuid 1 2
-
Run
# mount /mountpointto mount the brick. -
Run the
df -hcommand to verify the brick is successfully mounted:# df -h /dev/rhs_vg/rhs_lv 16G 1.2G 15G 7% /rhgs
-
If SElinux is enabled, then the SELinux labels that has to be set manually for the bricks created using the following commands:
# semanage fcontext -a -t glusterd_brick_t /rhgs/brick1
# restorecon -Rv /rhgs/brick1
Using Subdirectory as the Brick for Volume
You can create an XFS file system, mount them and point them as bricks while creating a GlusterFS volume. If the mount point is unavailable, the data is directly written to the root file system in the unmounted directory.
For example, the /rhgs directory is the mounted file system and is
used as the brick for volume creation. However, for some reason, if the
mount point is unavailable, any write continues to happen in the /rhgs
directory, but now this is under root file system.
To overcome this issue, you can perform the below procedure.
During GlusterFS setup, create an XFS file system and
mount it. After mounting, create a subdirectory and use this
subdirectory as the brick for volume creation. Here, the XFS file system
is mounted as /bricks. After the file system is available, create a
directory called /rhgs/brick1 and use it for volume creation. Ensure
that no more than one brick is created from a single mount. This
approach has the following advantages:
-
When the
/rhgsfile system is unavailable, there is no longer`/rhgs/brick1` directory available in the system. Hence, there will be no data loss by writing to a different location. -
This does not require any additional file system for nesting.
Perform the following to use subdirectories as bricks for creating a volume:
-
Create the
brick1subdirectory in the mounted file system.# mkdir /rhgs/brick1
Repeat the above steps on all nodes.
-
Create the GlusterFS volume using the subdirectories as bricks.
# gluster volume create distdata01 ad-rhs-srv1:/rhgs/brick1
ad-rhs-srv2:/rhgs/brick2
-
Start the GlusterFS volume.
# gluster volume start distdata01
-
Verify the status of the volume.
# gluster volume status distdata01
Note
If multiple bricks are used from the same server, then ensure the bricks are mounted in the following format. For example:
# df -h

/dev/rhs_vg/rhs_lv1   16G  1.2G   15G   7% /rhgs1
/dev/rhs_vg/rhs_lv2   16G  1.2G   15G   7% /rhgs2
Create a distribute volume with 2 bricks from each server. For example:
# gluster volume create test-volume server1:/rhgs1/brick1 server2:/rhgs1/brick1 server1:/rhgs2/brick2 server2:/rhgs2/brick2
- Brick with a File System Suitable for Reformatting (Optimal Method)
-
Run
# mkfs.xfs -f -i size=512 deviceto reformat the brick to supported requirements, and make it available for immediate reuse in a new volume. + __ NoteAll data will be erased when the brick is reformatted. ______________________________________________________
- File System on a Parent of a Brick Directory
-
If the file system cannot be reformatted, remove the whole brick directory and create it again.
Cleaning An Unusable Brick
-
Delete all previously existing data in the brick, including the
.glusterfssubdirectory. -
Run` # setfattr -x trusted.glusterfs.volume-id brick` and
# setfattr -x trusted.gfid brickto remove the attributes from the root of the brick. -
Run
# getfattr -d -m . brickto examine the attributes set on the volume. Take note of the attributes. -
Run
# setfattr -x attribute brickto remove the attributes relating to the glusterFS file system.The
trusted.glusterfs.dhtattribute for a distributed volume is one such example of attributes that need to be removed.
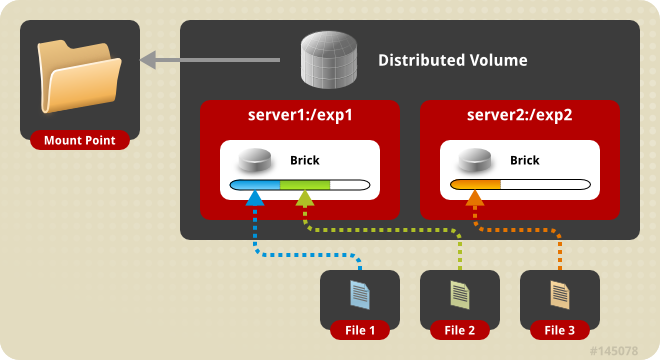
Creating Distributed Volumes
This type of volume spreads files across the bricks in the volume.
Warning
Distributed volumes can suffer significant data loss during a disk or server failure because directory contents are spread randomly across the bricks in the volume.
Use distributed volumes where scalable storage and redundancy is either not important, or is provided by other hardware or software layers.
Use gluster volume create command to create different types of
volumes, and gluster volume info command to verify successful volume
creation.
-
A trusted storage pool has been created, as described in Adding Servers to the Truster Storage Pool.
-
Understand how to start and stop volumes, as described in Starting Volumes.
Run the gluster volume create command to create the distributed
volume.
The syntax is` gluster volume create NEW-VOLNAME [transport tcp | rdma | tcp,rdma] NEW-BRICK…`
The default value for transport is tcp. Other options can be passed
such as auth.allow or auth.reject. See
Configuring Volume Options for a full list of parameters.
# gluster volume create test-volume server1:/rhgs/brick1 server2:/rhgs/brick1
Creation of test-volume has been successful
Please start the volume to access data.
# gluster volume create test-volume transport rdma server1:/rhgs/brick1 server2:/rhgs/brick1 server3:/rhgs/brick1 server4:/rhgs/brick1
Creation of test-volume has been successful
Please start the volume to access data.
Run # gluster volume start VOLNAME to start the volume.
# gluster volume start test-volume
Starting test-volume has been successful
Run gluster volume info command to optionally display the volume
information.
The following output is the result of Distributed volume with two servers.
# gluster volume info
Volume Name: test-volume
Type: Distribute
Status: Created
Number of Bricks: 2
Transport-type: tcp
Bricks:
Brick1: server1:/rhgs/brick
Brick2: server2:/rhgs/brick
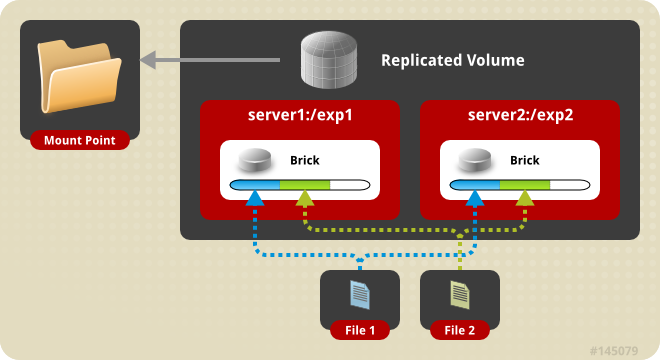
Creating Replicated Volumes
Replicated volume creates copies of files across multiple bricks in the volume. Use replicated volumes in environments where high-availability and high-reliability are critical.
Use gluster volume create to create different types of volumes, and
gluster volume info to verify successful volume creation.
Prerequisites.
-
A trusted storage pool has been created, as described in Adding Servers to the Truster Storage Pool.
-
Understand how to start and stop volumes, as described in Starting Volumes.
Creating Two-way Replicated Volumes
Two-way replicated volume creates two copies of files across the bricks in the volume. The number of bricks must be multiple of two for a replicated volume. To protect against server and disk failures, it is recommended that the bricks of the volume are from different servers.
Creating two-way replicated volumes
-
Run the
gluster volume createcommand to create the replicated volume.The syntax is
# gluster volume create NEW-VOLNAME [replica COUNT] [transport tcp | rdma | tcp,rdma] NEW-BRICK…The default value for transport is
tcp. Other options can be passed such asauth.alloworauth.reject. See Configuring Volume Options for a full list of parameters.The order in which bricks are specified determines how they are replicated with each other. For example, every
2bricks, where2is the replica count, forms a replica set. This is illustrated in [chap-Red_Hat_Storage_Volumes-twoway_replicated_volume] .# gluster volume create test-volume replica 2 transport tcp server1:/rhgs/brick1 server2:/rhgs/brick2 Creation of test-volume has been successful Please start the volume to access data.
-
Run
# gluster volume start VOLNAMEto start the volume.# gluster volume start test-volume Starting test-volume has been successful
-
Run
gluster volume infocommand to optionally display the volume information.
Important
You must set client-side quorum on replicated volumes to prevent split-brain scenarios. For more information on setting client-side quorum, see [Configuring_Client-Side_Quorum]
Creating Three-way Replicated Volumes
Three-way replicated volume creates three copies of files across multiple bricks in the volume. The number of bricks must be equal to the replica count for a replicated volume. To protect against server and disk failures, it is recommended that the bricks of the volume are from different servers.
Synchronous three-way replication is now fully supported in GlusterFS. Three-way replication volumes are supported only on JBOD configuration.

Creating three-way replicated volumes
-
Run the
gluster volume createcommand to create the replicated volume.The syntax is
# gluster volume create NEW-VOLNAME [replica COUNT] [transport tcp | rdma | tcp,rdma] NEW-BRICK…The default value for transport is
tcp. Other options can be passed such asauth.alloworauth.reject. See Configuring Volume Options for a full list of parameters.The order in which bricks are specified determines how bricks are replicated with each other. For example, every
nbricks, where3is the replica count forms a replica set. This is illustrated in [chap-Red_Hat_Storage_Volumes-twoway_replicated_volume].# gluster volume create test-volume replica 3 transport tcp server1:/rhgs/brick1 server2:/rhgs/brick2 server3:/rhgs/brick3 Creation of test-volume has been successful Please start the volume to access data.
-
Run
# gluster volume start VOLNAMEto start the volume.# gluster volume start test-volume Starting test-volume has been successful
-
Run
gluster volume infocommand to optionally display the volume information.
Important
By default, the client-side quorum is enabled on three-way replicated volumes to minimize split-brain scenarios. For more information on client-side quorum, see [Configuring_Client-Side_Quorum]
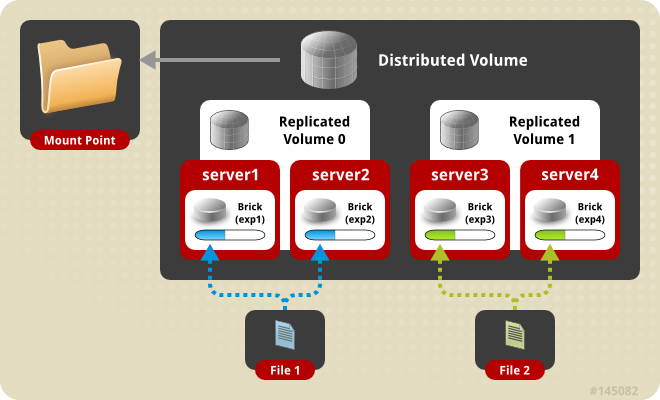
Creating Distributed Replicated Volumes
Use distributed replicated volumes in environments where the requirement to scale storage, and high-reliability is critical. Distributed replicated volumes also offer improved read performance in most environments.
Note
The number of bricks must be a multiple of the replica count for a distributed replicated volume. Also, the order in which bricks are specified has a great effect on data protection. Each replica_count consecutive bricks in the list you give will form a replica set, with all replica sets combined into a distribute set. To ensure that replica-set members are not placed on the same node, list the first brick on every server, then the second brick on every server in the same order, and so on.
Prerequisites.
-
A trusted storage pool has been created, as described in Adding Servers to the Truster Storage Pool.
-
Understand how to start and stop volumes, as described in Starting Volumes.
Creating Two-way Distributed Replicated Volumes
Two-way distributed replicated volumes distribute and create two copies of files across the bricks in a volume. The number of bricks must be multiple of the replica count for a replicated volume. To protect against server and disk failures, the bricks of the volume should be from different servers.
Creating two-way distributed replicated volumes
-
Run the
gluster volume createcommand to create the distributed replicated volume.The syntax is
# gluster volume create NEW-VOLNAME [replica COUNT] [transport tcp | rdma | tcp,rdma] NEW-BRICK…The default value for transport is
tcp. Other options can be passed such asauth.alloworauth.reject. See Configuring Volume Options for a full list of parameters.The order in which bricks are specified determines how they are replicated with each other. For example, the first two bricks specified replicate each other where 2 is the replica count.
# gluster volume create test-volume replica 2 transport tcp server1:/rhgs/brick1 server2:/rhgs/brick1 server3:/rhgs/brick1 server4:/rhgs/brick1 Creation of test-volume has been successful Please start the volume to access data.
# gluster volume create test-volume replica 2 transport tcp server1:/rhgs/brick1 server2:/rhgs/brick1 server3:/rhgs/brick1 server4:/rhgs/brick1 server5:/rhgs/brick1 server6:/rhgs/brick1 Creation of test-volume has been successful Please start the volume to access data.
-
Run
# gluster volume start VOLNAMEto start the volume.# gluster volume start test-volume Starting test-volume has been successful
-
Run
gluster volume infocommand to optionally display the volume information.
Important
You must ensure to set server-side quorum and client-side quorum on the distributed-replicated volumes to prevent split-brain scenarios. For more information on setting quorums, see [sect-Preventing_Split-brain]
Creating Three-way Distributed Replicated Volumes
Three-way distributed replicated volume distributes and creates three copies of files across multiple bricks in the volume. The number of bricks must be equal to the replica count for a replicated volume. To protect against server and disk failures, it is recommended that the bricks of the volume are from different servers.
Synchronous three-way replication is now fully supported in GlusterFS . Three-way replication volumes are supported only on JBOD configuration.

Creating three-way distributed replicated volumes
-
Run the
gluster volume createcommand to create the distributed replicated volume.The syntax is
# gluster volume create NEW-VOLNAME [replica COUNT] [transport tcp | rdma | tcp,rdma] NEW-BRICK…The default value for transport is
tcp. Other options can be passed such asauth.alloworauth.reject. See Configuring Volume Options for a full list of parameters.The order in which bricks are specified determines how bricks are replicated with each other. For example, first 3 bricks, where 3 is the replica count forms a replicate set.
# gluster volume create test-volume replica 3 transport tcp server1:/rhgs/brick1 server2:/rhgs/brick1 server3:/rhgs/brick1 server4:/rhgs/brick1 server5:/rhgs/brick1 server6:/rhgs/brick1 Creation of test-volume has been successful Please start the volume to access data.
-
Run
# gluster volume start VOLNAMEto start the volume.# gluster volume start test-volume Starting test-volume has been successful
-
Run
gluster volume infocommand to optionally display the volume information.
Important
By default, the client-side quorum is enabled on three-way distributed replicated volumes. You must also set server-side quorum on the distributed-replicated volumes to prevent split-brain scenarios. For more information on setting quorums, see [sect-Preventing_Split-brain].
Creating Dispersed Volumes
Dispersed volumes are based on erasure coding. Erasure coding (EC) is a method of data protection in which data is broken into fragments, expanded and encoded with redundant data pieces and stored across a set of different locations. This allows the recovery of the data stored on one or more bricks in case of failure. The number of bricks that can fail without losing data is configured by setting the redundancy count.
Dispersed volume requires less storage space when compared to a replicated volume. It is equivalent to a replicated pool of size two, but requires 1.5 TB instead of 2 TB to store 1 TB of data when the redundancy level is set to 2. In a dispersed volume, each brick stores some portions of data and parity or redundancy. The dispersed volume sustains the loss of data based on the redundancy level.

The data protection offered by erasure coding can be represented in
simple form by the following equation: n = k + m. Here n is the
total number of bricks, we would require any k bricks out of n
bricks for recovery. In other words, we can tolerate failure up to any
m bricks. With this release, the following configurations are
supported:
-
6 bricks with redundancy level 2 (4 +2)
-
11 bricks with redundancy level 3 (8 +3)
-
12 bricks with redundancy level 4 (8 + 4)
Use gluster volume create to create different types of volumes, and
gluster volume info to verify successful volume creation.
Prerequisites
-
Create a trusted storage pool as described in Adding Servers to the Truster Storage Pool.
-
Understand how to start and stop volumes, as described in Starting Volumes.
Important
recommends you to review the Dispersed Volume configuration recommendations explained in <<chap-Gluster_Volumes-Creating_Dispersed_Volumes_1>> before creating the Dispersed volume.
To Create a dispersed volume
-
Run the
gluster volume createcommand to create the dispersed volume.The syntax is
# gluster volume create NEW-VOLNAME [disperse-data COUNT] [redundancy COUNT] [transport tcp | rdma | tcp,rdma] NEW-BRICK…The number of bricks required to create a disperse volume is the sum of
disperse-data countandredundancy count.The
disperse-data`count` option specifies the number of bricks that is part of the dispersed volume, excluding the count of the redundant bricks. For example, if the total number of bricks is 6 andredundancy-countis specified as 2, then the disperse-data count is 4 (6 - 2 = 4). If the ` disperse-data countoption is not specified, and only theredundancy count` option is specified, then thedisperse-data countis computed automatically by deducting the redundancy count from the specified total number of bricks.Redundancy determines how many bricks can be lost without interrupting the operation of the volume. If
redundancy countis not specified, based on the configuration it is computed automatically to the optimal value and a warning message is displayed.The default value for transport is
tcp. Other options can be passed such asauth.alloworauth.reject. See About Encrypted Disk for a full list of parameters.# gluster volume create test-volume disperse-data 4 redundancy 2 transport tcp server1:/rhgs1/brick1 server2:/rhgs2/brick2 server3:/rhgs3/brick3 server4:/rhgs4/brick4 server5:/rhgs5/brick5 server6:/rhgs6/brick6 Creation of test-volume has been successful Please start the volume to access data.
-
Run
# gluster volume start VOLNAMEto start the volume.# gluster volume start test-volume Starting test-volume has been successful
-
Run
gluster volume infocommand to optionally display the volume information.
Creating Distributed Dispersed Volumes
Distributed dispersed volumes support the same configurations of erasure coding as dispersed volumes. The number of bricks in a distributed dispersed volume must be a multiple of (K+M). With this release, the following configurations are supported:
-
Multiple disperse sets containing 6 bricks with redundancy level 2
-
Multiple disperse sets containing 11 bricks with redundancy level 3
-
Multiple disperse sets containing 12 bricks with redundancy level 4
Use gluster volume create to create different types of volumes, and
gluster volume info to verify successful volume creation.
Prerequisites
-
A trusted storage pool has been created, as described in Adding Servers to the Truster Storage Pool.
-
Understand how to start and stop volumes, as described in Starting Volumes.

Creating distributed dispersed volumes
Important
recommends you to review the Distributed Dispersed Volume configuration recommendations explained in <<chap-Recommended-Configuration_Dispersed>> before creating the Distributed Dispersed volume.
-
Run the
gluster volume createcommand to create the dispersed volume.The syntax is
# gluster volume create NEW-VOLNAME disperse-data COUNT [redundancy COUNT] [transport tcp | rdma | tcp,rdma] NEW-BRICK…The default value for transport is
tcp. Other options can be passed such asauth.alloworauth.reject. See [chap-Gluster_Volumes-distributed_dispersed_volume] for a full list of parameters.# gluster volume create test-volume disperse-data 4 redundancy 2 transport tcp server1:/rhgs1/brick1 server2:/rhgs2/brick2 server3:/rhgs3/brick3 server4:/rhgs4/brick4 server5:/rhgs5/brick5 server6:/rhgs6/brick6 server1:/rhgs7/brick7 server2:/rhgs8/brick8 server3:/rhgs9/brick9 server4:/rhgs10/brick10 server5:/rhgs11/brick11 server6:/rhgs12/brick12 Creation of test-volume has been successful Please start the volume to access data.
The above example is illustrated in [chap-Gluster_Volumes-distributed_dispersed_volume]. In the illustration and example, you are creating 12 bricks from 6 servers.
-
Run
# gluster volume start VOLNAMEto start the volume.# gluster volume start test-volume Starting test-volume has been successful
-
Run
gluster volume infocommand to optionally display the volume information.
Starting Volumes
Volumes must be started before they can be mounted.
To start a volume, run # gluster volume start VOLNAME
Note
Every volume that is created is exported by default through the SMB protocol. If you want to disable it, please refer [Disabling-SMB-shares] before starting the volume.
For example, to start test-volume:
# gluster volume start test-volume
Starting test-volume has been successful